
Warlord Titan – Painting the Legs Part I
I covered the primed lower torso with Citadel Lead Belcher spray.

Then, I liberally applied buckets of Nuln Oil to the lower torso. It was messy… nuln oil was spattering all across my cutting mat, and citadel washes have a certain less than pleasant smell. It’s winter here and there are no flies, but somehow, somewhere, father Nurgle hatched a housefly just for me and I witnessed a fly buzzing around the drying nuln oil. I wonder what that stuff is made of…


Once the nuln oil dried (overnight, with the flies) I laid down a very light coat of waywatcher green glaze. The trick here is to not let it pool up, where it’ll look bright green. We’re just going for a slight tint to add some depth to the metal. If you really want to go crazy, you can actually add multiple tints (maybe a magenta) and make the metal even more complex.


After the glaze dries (pretty fast, a few minutes) it’s time to dry brush about half a pot of necron compound.


And that’s the basic metallic finish I’m using for the titan legs. 5 coats. Primer + Lead Belcher Spray + Nuln Oil + Waywatcher Green + Necron Compound dry brush. I sixth coat of the magenta glaze/tint would add more awesomeness.
Below I’m applying the same steps to the main leg pistons, plus the beginnings of the warning stripes.
I used the citadel Led Belcher Air to hit the back of the leg pistons (after masking the fronts)


Then I threw down the Nuln Oil

Masked Even More (PITA)

Then, I sprayed Creatix wicked Golden Yellow. For some reason of physics I don’t understand, yellows are always a complete pain the butt. It took about 30 coats to get the color saturation required without pooling/orange peeling the pigments.

And here is is a picture of my ArtoGraph 1520 Spray Booth but with the metal hood, which I don’t see on the artograph website any more.
So…much…painting…left. YAY! :)
Share this:

Priming the Warlord Titan
I started 207 days ago (6 months, 23 days) and just this weekend got to ‘construction complete’ ! My very demanding career, even more demanding toddler, and a new home purchase & family move significantly slowed down my play time.
Anyhow, time to start the slow process of painting.
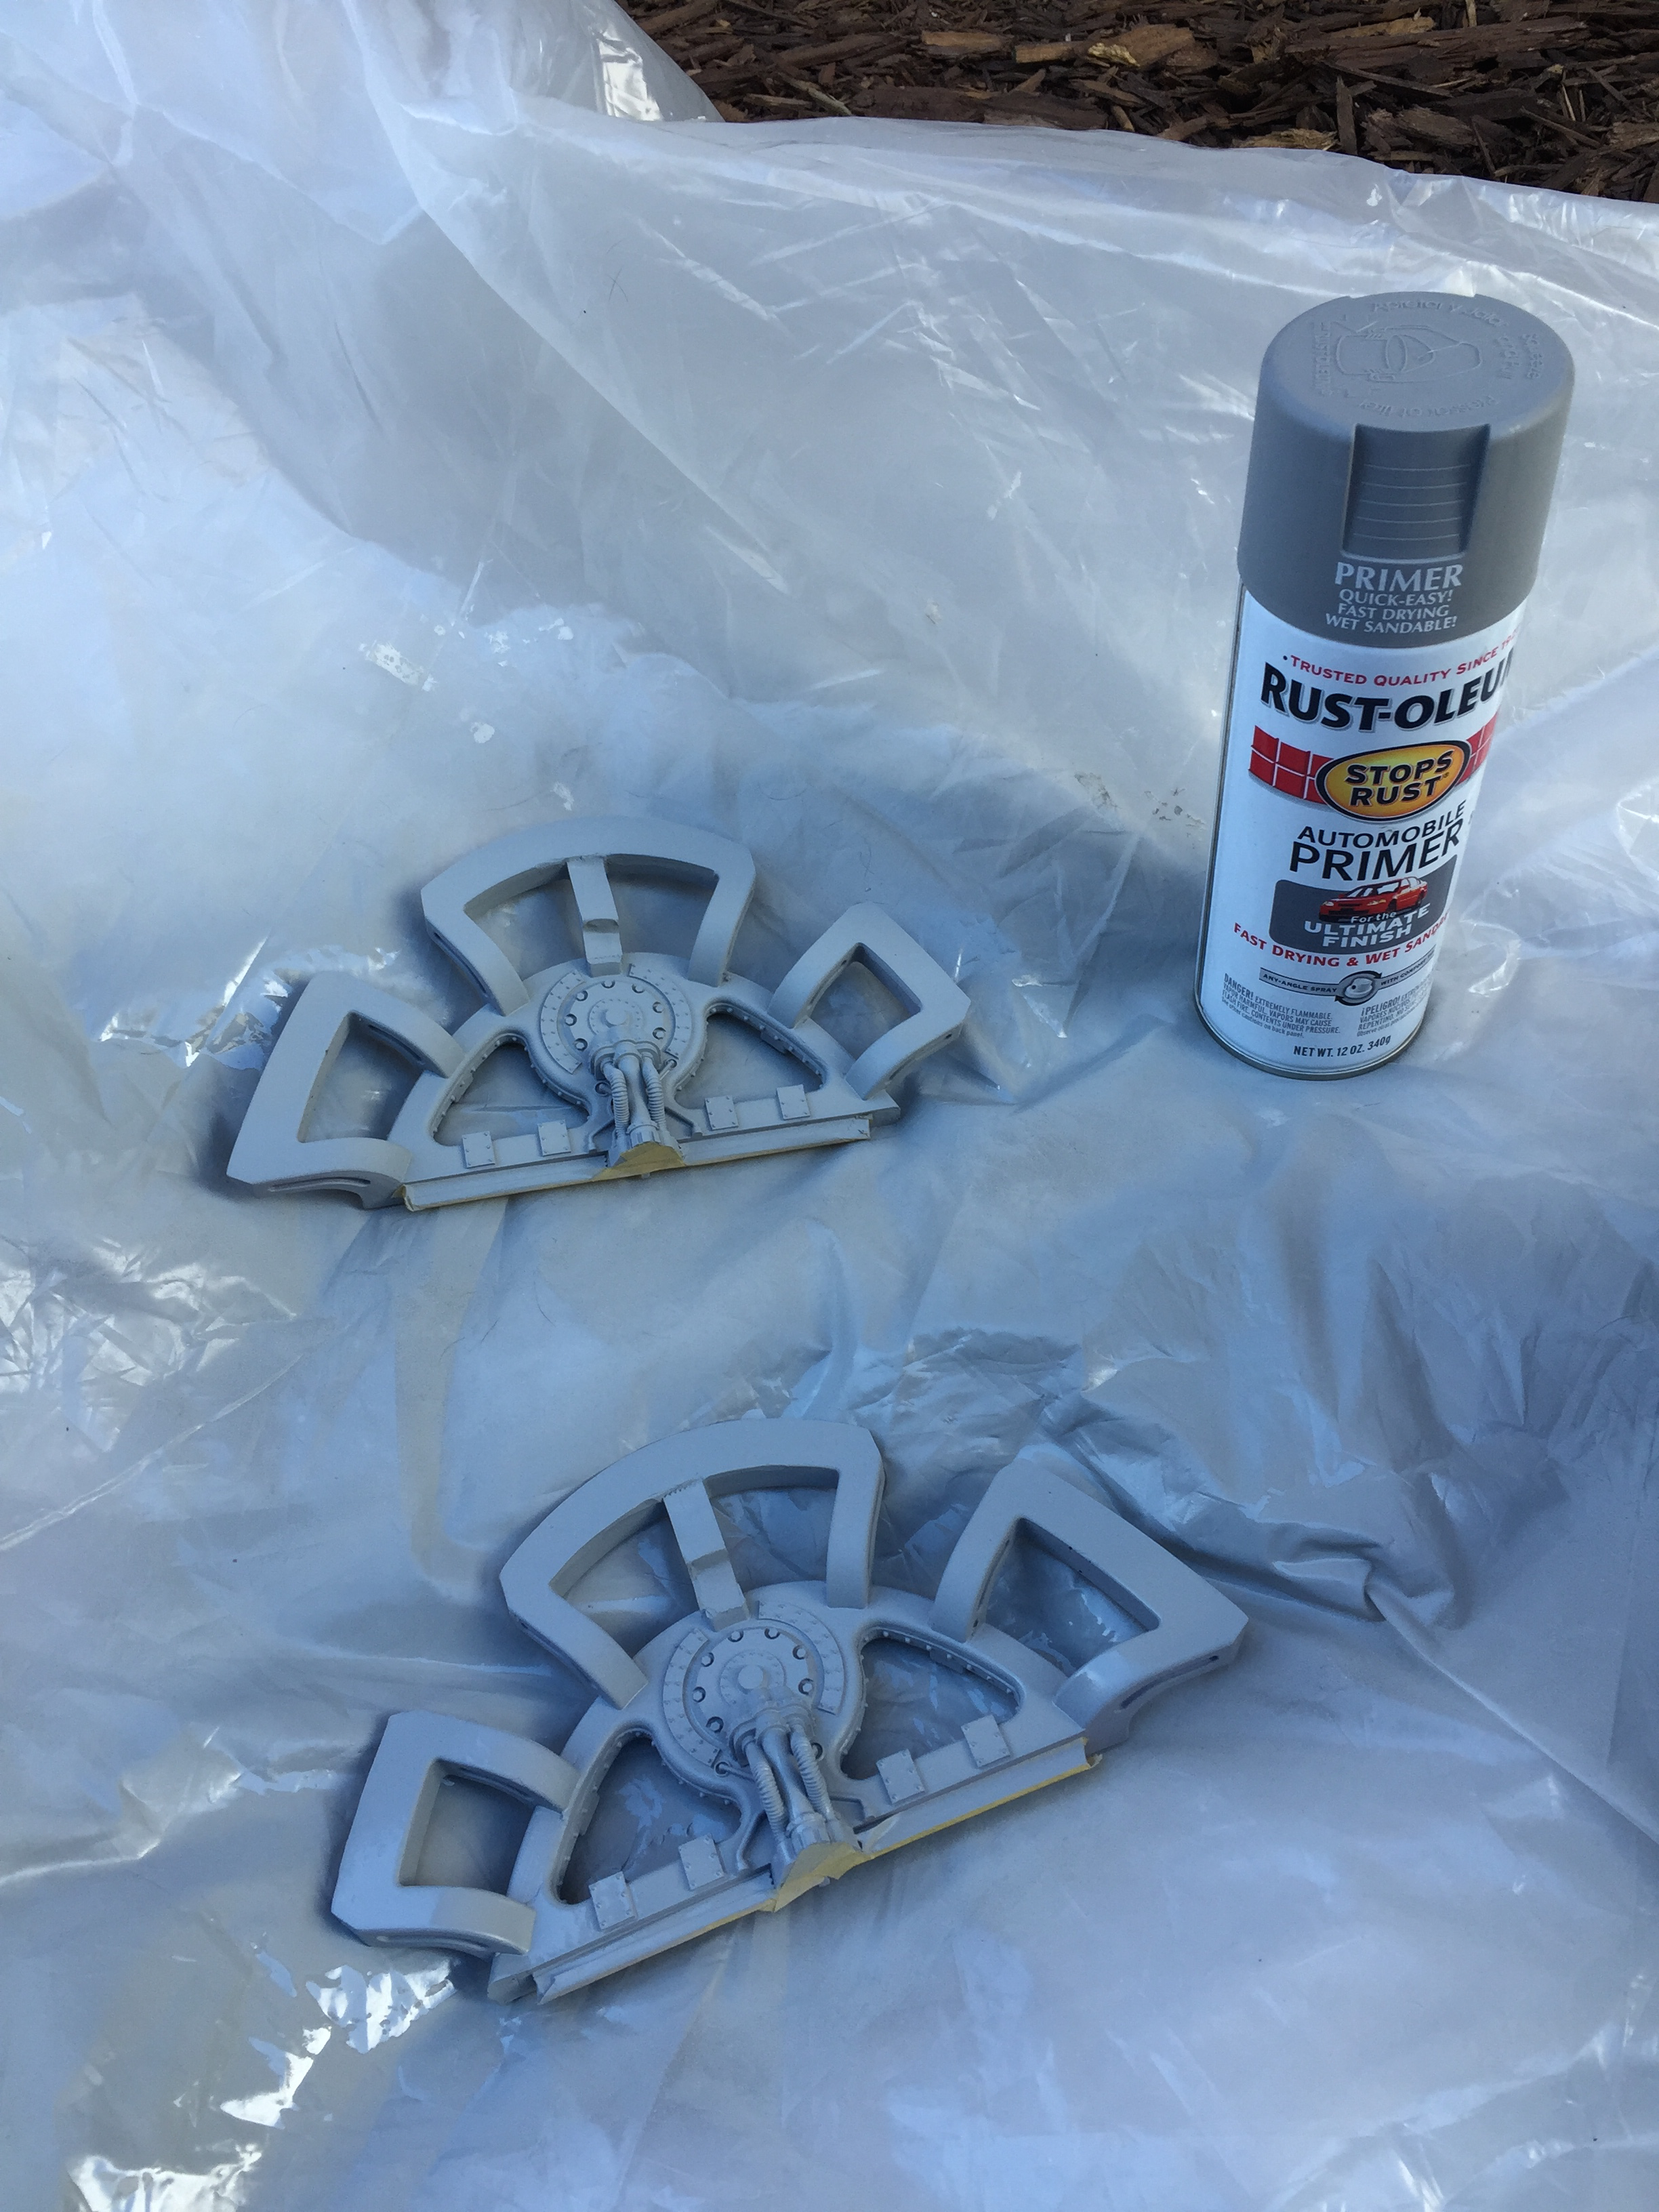
This weekend it was all about priming. I use Rust-Oleum Gray Sandable Primer for a few reasons.
- Gray: I like gray over black so I can create ‘highlights’ on the panels. I lay down a lighter gray base primer over the entire model, then add shadows with black primer around the edges of the armor panels. When laying down airbrush colors, which are almost all transparent to some degree (think ‘tint’ instead of ‘cover’), the color over the gray is brighter than the black, creating depth and making the model look less flat.
- Sandable: I sprayed at a temperature in the mid 80’s (crazy for February, welcome to San Diego, CA!). This is slightly warm for spray cans, which mean that some of the paint dries slightly before it adheres. This can leave a slightly rough surface texture. Because it’s a sandable primer, I can (and will) use steel wool to smooth down the primer coat and get a nice clean finish once I start using the airbrush.
- Spray Can: Usually I HATE spray cans, as they produce splotchy light/heavy coats, are difficult to control, waste a bunch of paint with overspray, smell horrible, and are super dangerous (read the MSDS!). However, what they excel at is adhesion. All those solvents (Acetone, Xylene, Mineral Spirits, Propane, Butane) really make that paint STICK! This is super critical when painting over resin. There is nothing more tragic (relatively speaking of course) then spending 100+ hours painting a Titan only to have the paint flake off when removing a mask on a critical part of the model. It’s happened to me, it sucked, wash your resin and lay down a good primer coat!
You can see masking done in the image gallery below. While masking the glue joint areas is time consuming, if you don’t do it, you either end up gluing paint film to paint film (which is a super weak bond) or you have to spend hours and hours scraping paint off the joint surfaces. This way, once painting is done it’s a simple matter of removing the mask, scoring the raw resin with an x-acto knife, and using Cyanoacrylate (CA) or JBWeld to get a strong joint.
Because it’s a spray can, there’s a huge amount of overspray, thus the giant piece of cardboard and the improvised spray station in the back yard.
Since I have a toddler, and spray paint has nasty solvents, I let the paint cure overnight in the garage before bringing back into my workshop. Even then my workshop smelled like a chemical factory for a few days (again, I usually avoid spray cans like the plague!).


Once the primer has dried for a good long period (I waited a day) I use steel wool to smooth over the finish. It creates a smoother finish, but creates a giant mess of steel wool lint all over the model. Fortunately, steel wool is magnetic and can be easily cleaned using magnets!

In this video you can see me pull off the steel wool lint. There is some lint stuck near the ‘eyes’ of the Titan because there’s another magnet up there, so I had to remove that with a q-tip.
Share this:

Warlord Titan Arm Magnetization
I started off by gluing in 3/4″ metal washers to the upper shoulder mounts and the big 3/4″ magnets (DC6 magnets from K&J with a 24 pound pull force magnet to magnet) in the arms themselves. The heavy volcano cannon arms did stick, and the ‘straight down’ pull force was nice and heavy, but it was a bit too easy to ‘twist off / pull to the side’ the cannon and remove it. I was envisioning carrying the titan through a store, bumping something, and the arm falling off… so I changed strategies (see below).

Here’s the 3/4″ magnet in the lower arm assembly.

A #8 bolt/nut, cut to length, with holes drilled in the elbow/cannon.

Here’s the bolt installed. This works generally and makes the gun detachable, but right now it’s sort of ‘swings loose’ at the elbow joint, so I can’t statically position the gun at a certain angle. Without the armor plates installed, it seems to swing out basically level. This means that the elbow is at the balance point of the gun, the back or front isn’t significantly heavier than the other, and this may change once the armor plates are installed.

After being worried about the pull strength of the magnet + washer, I drilled in from the top of the shoulder and installed another 3/4″ magnet in the top. Now the pull force is nice and heavy… very little chance the arm will just ‘fall off’ when bumped, and it requires very deliberate pull force to remove.

The downside to a magnet in the upper shoulder (instead of just the washer) is that I had to spend a lot of time notching out the upper shoulder plates so they would fit ‘flat’ over the magnet. This is why I tried the metal washer approach to begin with, but after 30 minutes of filing was able to get the shoulder plates to lay flat, and the magnet is covered up nicely when everything is installed so I’m okay with the looks of the ‘magnet on top’ approach.
I tried popping out the washer…but JBWeld is strong stuff and it wasn’t going to pop out, sut I have an extra 1/8″ of height on the upper shoulder magnet that I wouldn’t need had I just gone with the magnet only in the upper shoulder.
Below, you can see the upper should plate masked off before I painted. The middle support ‘bar’ with the masking tape on it clearly shows the notch I had to put in for the plate to sit flat. I also had to file down a few other locations on the shoulder plate to get it to sit flat, but the notch where the masking tape shows up is the biggest modification required.

Because it’ll be very difficult to paint between the upper shoulder and the shoulder late, I went ahead and primed/painted both before gluing everything in. I use rust-oleum gray sand-able primer (found at an auto parts store) for the primer, and I tried games workshop new airbrush paint (leadbelcher). I don’t use much Games Workshop paint, but still love their metallics.
I didn’t prime the entire upper torso (yet), just the sides near the shoulder assemblies.

Here is the shoulder, painted up with Games Workshop Leadbelcher Air

And a picture with the volcano cannon attached (magnetically)

The shoulder plates after lots of notching/filing so they sit ‘flat’ on the shoulders.
Hole drilled ready for the 1/2″ magnets (SD84-IN from K&J with a 9.9 pound pull force magnet to magnet) for the shoulder mount

The shoulder mount with a 1/2″ magnet installed / glued in place.

And that’s the overview of the way I approached the arms/shoulders/magnets/bolts on the warlord titan.
Warlord Titan Head LED lighting
My other titans have LED lighting in the cockpit, and I can’t have my biggest, baddest titan without!
Goals:
- Lighting in the warlord Titan, to compliment (but not match) my reaver and two warhounds
- Slightly less bright LEDs that the others… so I can photograph the warlord with the LEDs on w/o blowing out the exposure on the pictures.
- Replaceable LEDs in case they fail or I want to change the brightness/color.
- Removable battery/switch, such that when the battery is not installed it doesn’t add a huge clumsy artifact to the model
- Doesn’t obstruct anything in the cockpit, both Moderati and the Princeps still need to fit.
- Allows the head to be detached from the main body (magnetized) so I can purchase additional heads/cockpits and swap them out.
You can see how I achieved those goals below. I wired through the main torso with 24 gauge wire I had on hand… it’s pretty heavy wire for this appliucation, and if I were to special order wire I’d probably go with 26 or even 28 gauge wire. It would have been a bit more fragile but easier to route in the cockpit.
I crimped the connectors using the ‘PA-09’ crimping tool, which is a must for making your own connectors with smaller gauge wire. I happen to have all this gear because two of my other hobbies (drones and Arduino/physical computing/IoT)
Drilling the holes for the nylon LED holders was a bit dodgy as it just feels wrong drilling out detail on a model like this. Because we can buy the heads separately it’s much less nerve racking, as a mistake mean you ruin/degrade a $88 head instead of a $1800 complete titan. Still sketchy, but thank you ForgeWorld for selling the heads separately!


Here is a screen capture of the digikey order for the JST connectors. I bought a (lot) extra and JST connectors are just really handy to have on hand.

The black LED holders are digikey part number 67-1330-ND, and are ‘holder LED panel 3mm black nylon’ from ‘lumex opto/components inc’
The LEDs I used are digikey part number 516-2328-ND, AND ARE ‘LED 3MM Alingap Hi Perf Amber’ from ‘Avago Technologies US Inc)
I don’t have the part number of the resistors or battery pack. Adafruit has a nice iphone app ‘circuit playground’ that lets you choose the right resistors based on the ‘forward & supply voltage and forward current. I think the battery pack came from SparkFun. It’s 2xAA, which is pretty big, so I might switch over to a small LiPo battery or a 2xAAA solution in the future. The whole reason I connected everything up with the JST connectors is so I can swap stuff out later. I might build something warhammer-ish with existing bitz around a lipo pack and paint it up so it looks more integrated in the future.
So far I’m happy with it. One optimization would be to miniaturize the connectors and the battery solution to make them less obvious on the finished model. I went with an external battery pack because there is no accessible ‘inside’ on the warlord like the warhound/reaver, .
The Emperor Protects! Praise the Omnissiah!
Share this:

Forgeworld Warlord Titan Torso Build
For all of the below steps, I used good old JBWeld. Here you can see the two steps of mixing up the epoxy. First squeeze out relatively equal amounts of hardener (White-ish line) and ‘steel’ (dark grey). I pop off the end of a q-tip and mix the epoxy until it’s consistently grey.

Here’s a test fit of the major pieces before the upper right rear torso is glued in place.
I rough up all of the joint surfaces with an x-acto blade, and put red dots on all the surfaces that require glue so I don’t miss any surfaces or put down glue on something that isn’t supposed to have it.
Here’s me clamping in the upper rear torso.
This is where I made a slight mistake…the upper rear torso wasn’t aligned perfectly (it sagged a bit ‘low’) and this created a miss-alignment in the torso block.

Below you can see the misalignment. The middle inner ‘vent box’ is too low. The trick to to get the ‘upper rear torso’ glued in at exactly the right height. If I were to do it again, I’d glue in at least one of the ‘upper torso’ sides first so I could line up the ‘upper rear torso’ pieces correctly.

Preparing to glue the torso front plate. Again, roughing up the bonding surfaces with an x-acto knife and adding red dots so I apply JBWeld to the right surfaces.
Side view of the torso being clamped while the JBWeld is curing. I put the top plate on even though it wasn’t being glued in to make sure the sides cured at the right angle.

Front view of the torso sides being clamped while the JBWeld is curing. At this stage the front plate isn’t glued in…it’s just sitting in there to line everything up.

Top View of the torso box being glued together.

Before gluing the top plate on, I ran 4 wires through the lower torso, for 2x LED lights in the cockpit.

Relatively tricky placement of the clamps to glue on the Carapace front.

Carapace front being JBWelded on with the tricky clamps.

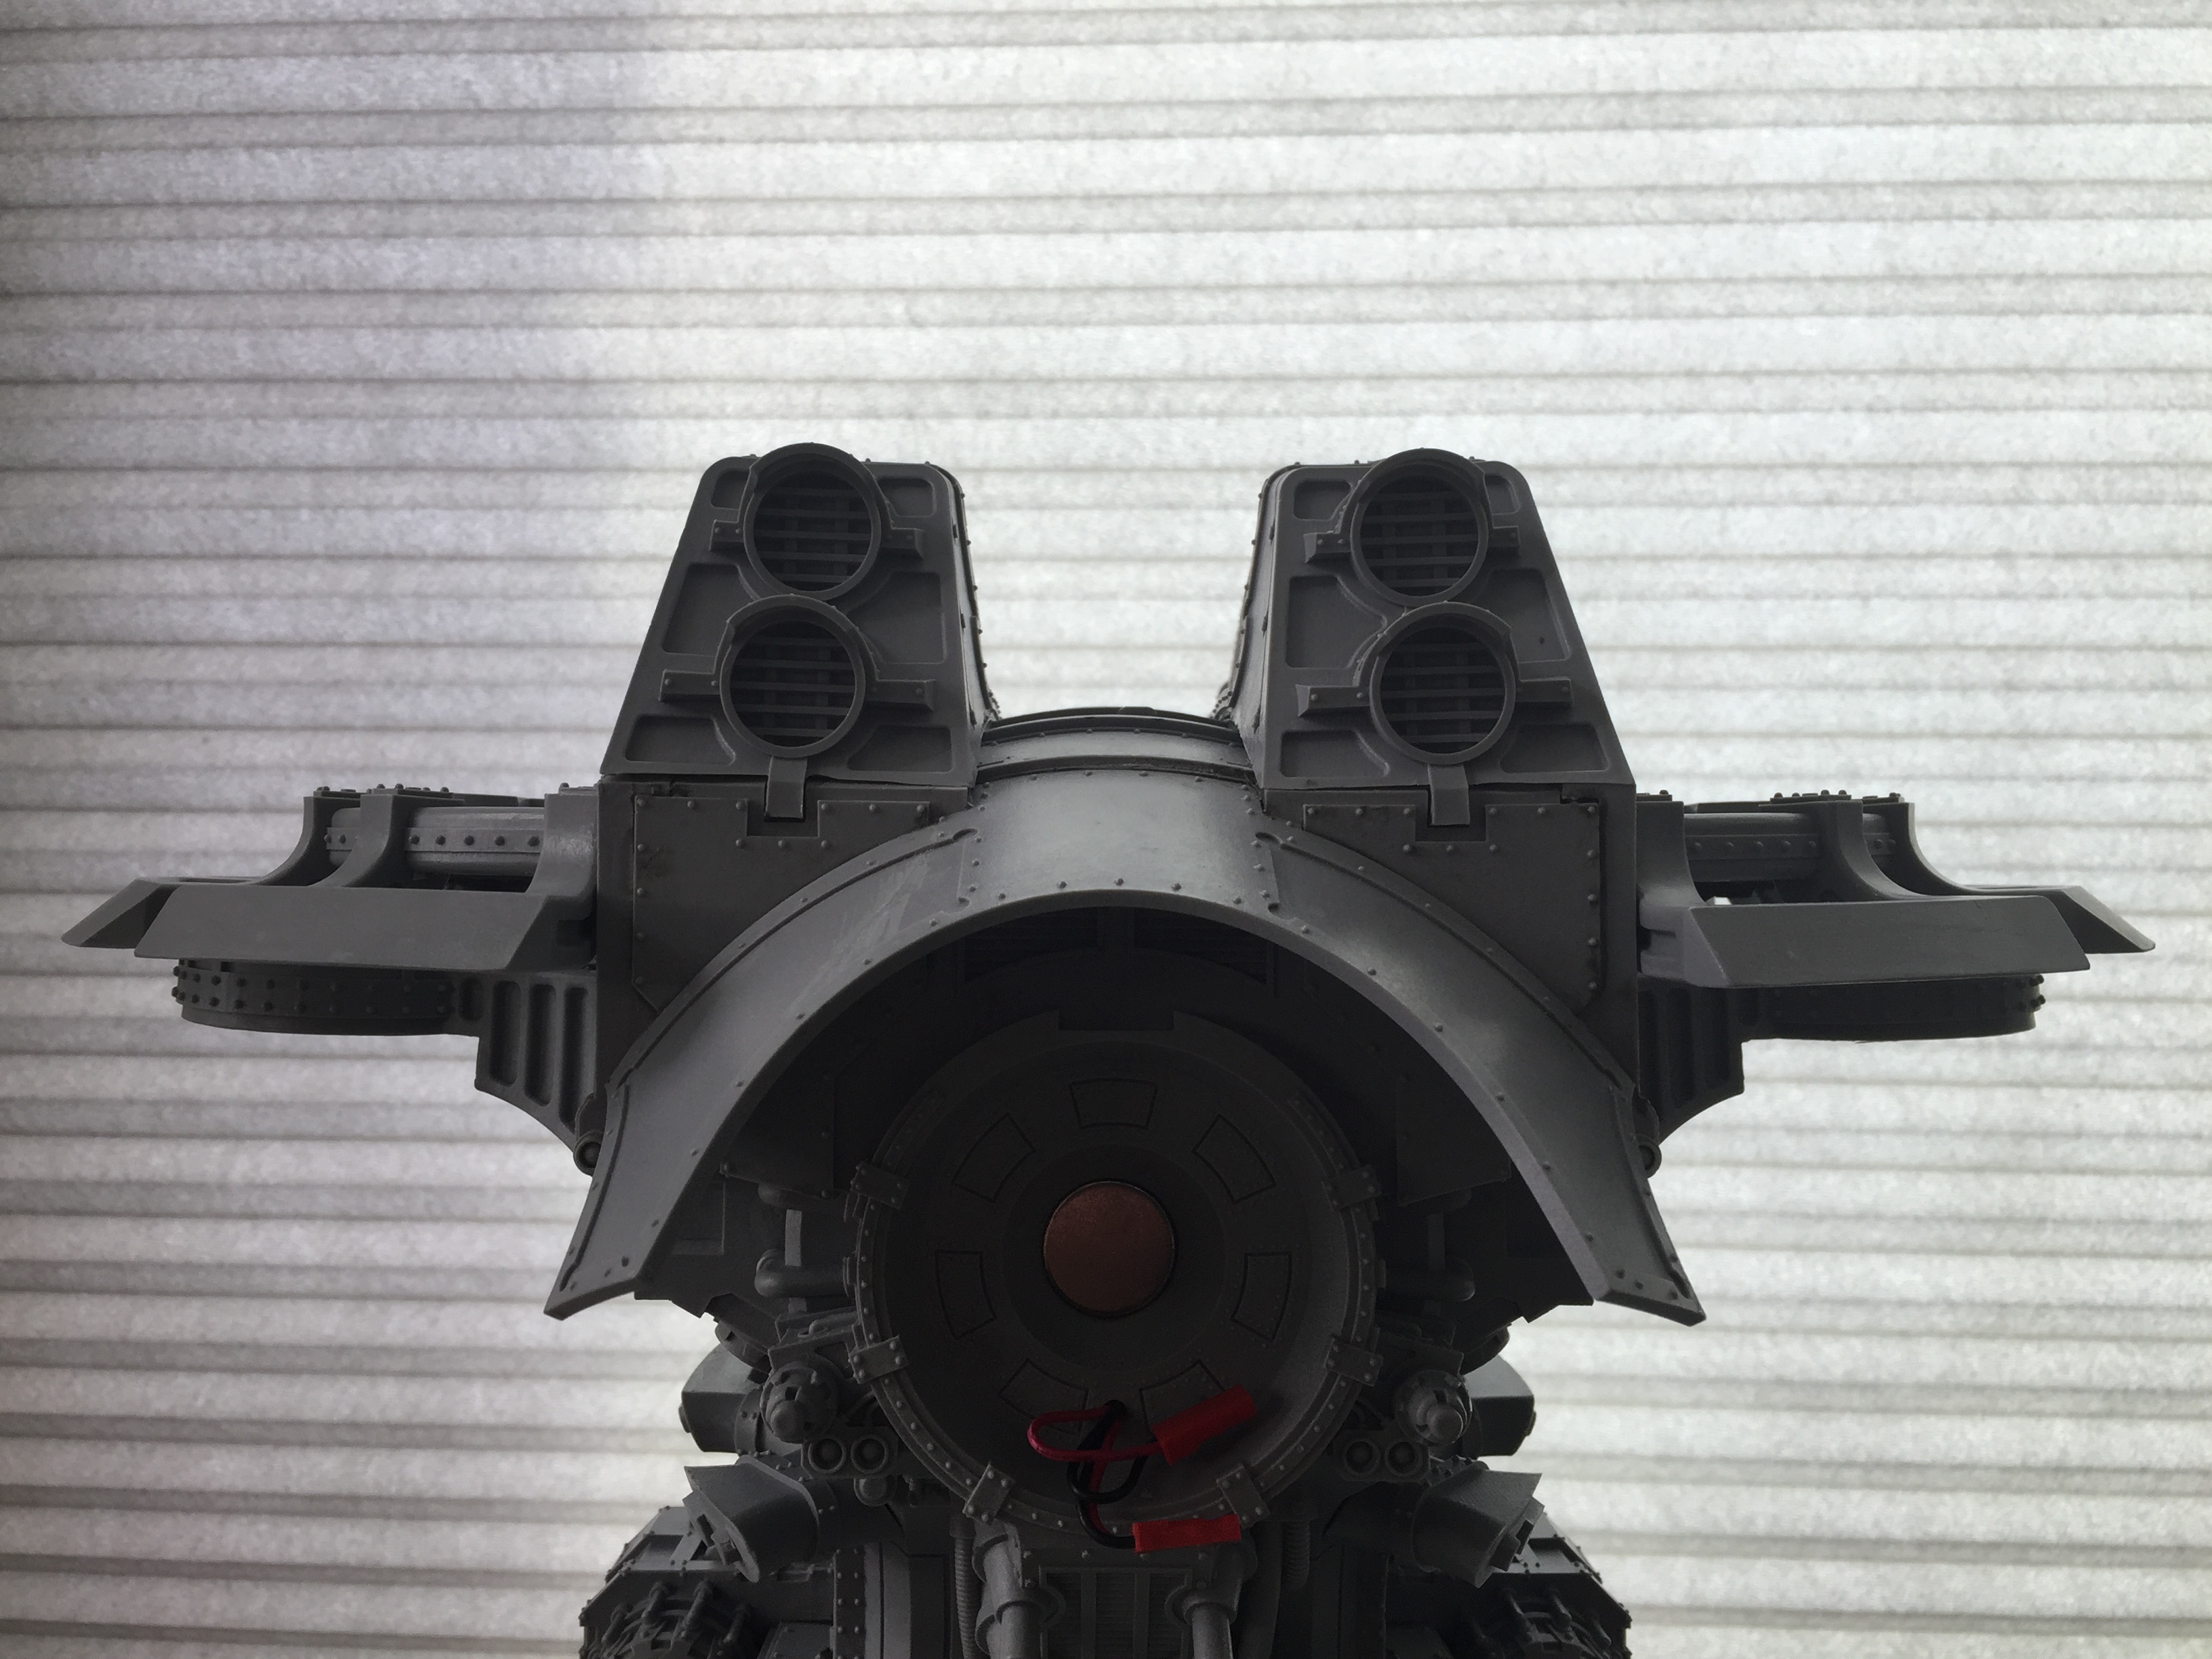
Clamps securing the exhaust vents.

gluing the exhaust intakes to the exhaust ridgets.

Gluing the exhaust ridges to the top carapace

Exhaust ridge clamps
And that’s the major pieces of the “Torso Box”
Share this:

Warlord Titan Assembly – Magnetizing the Torso
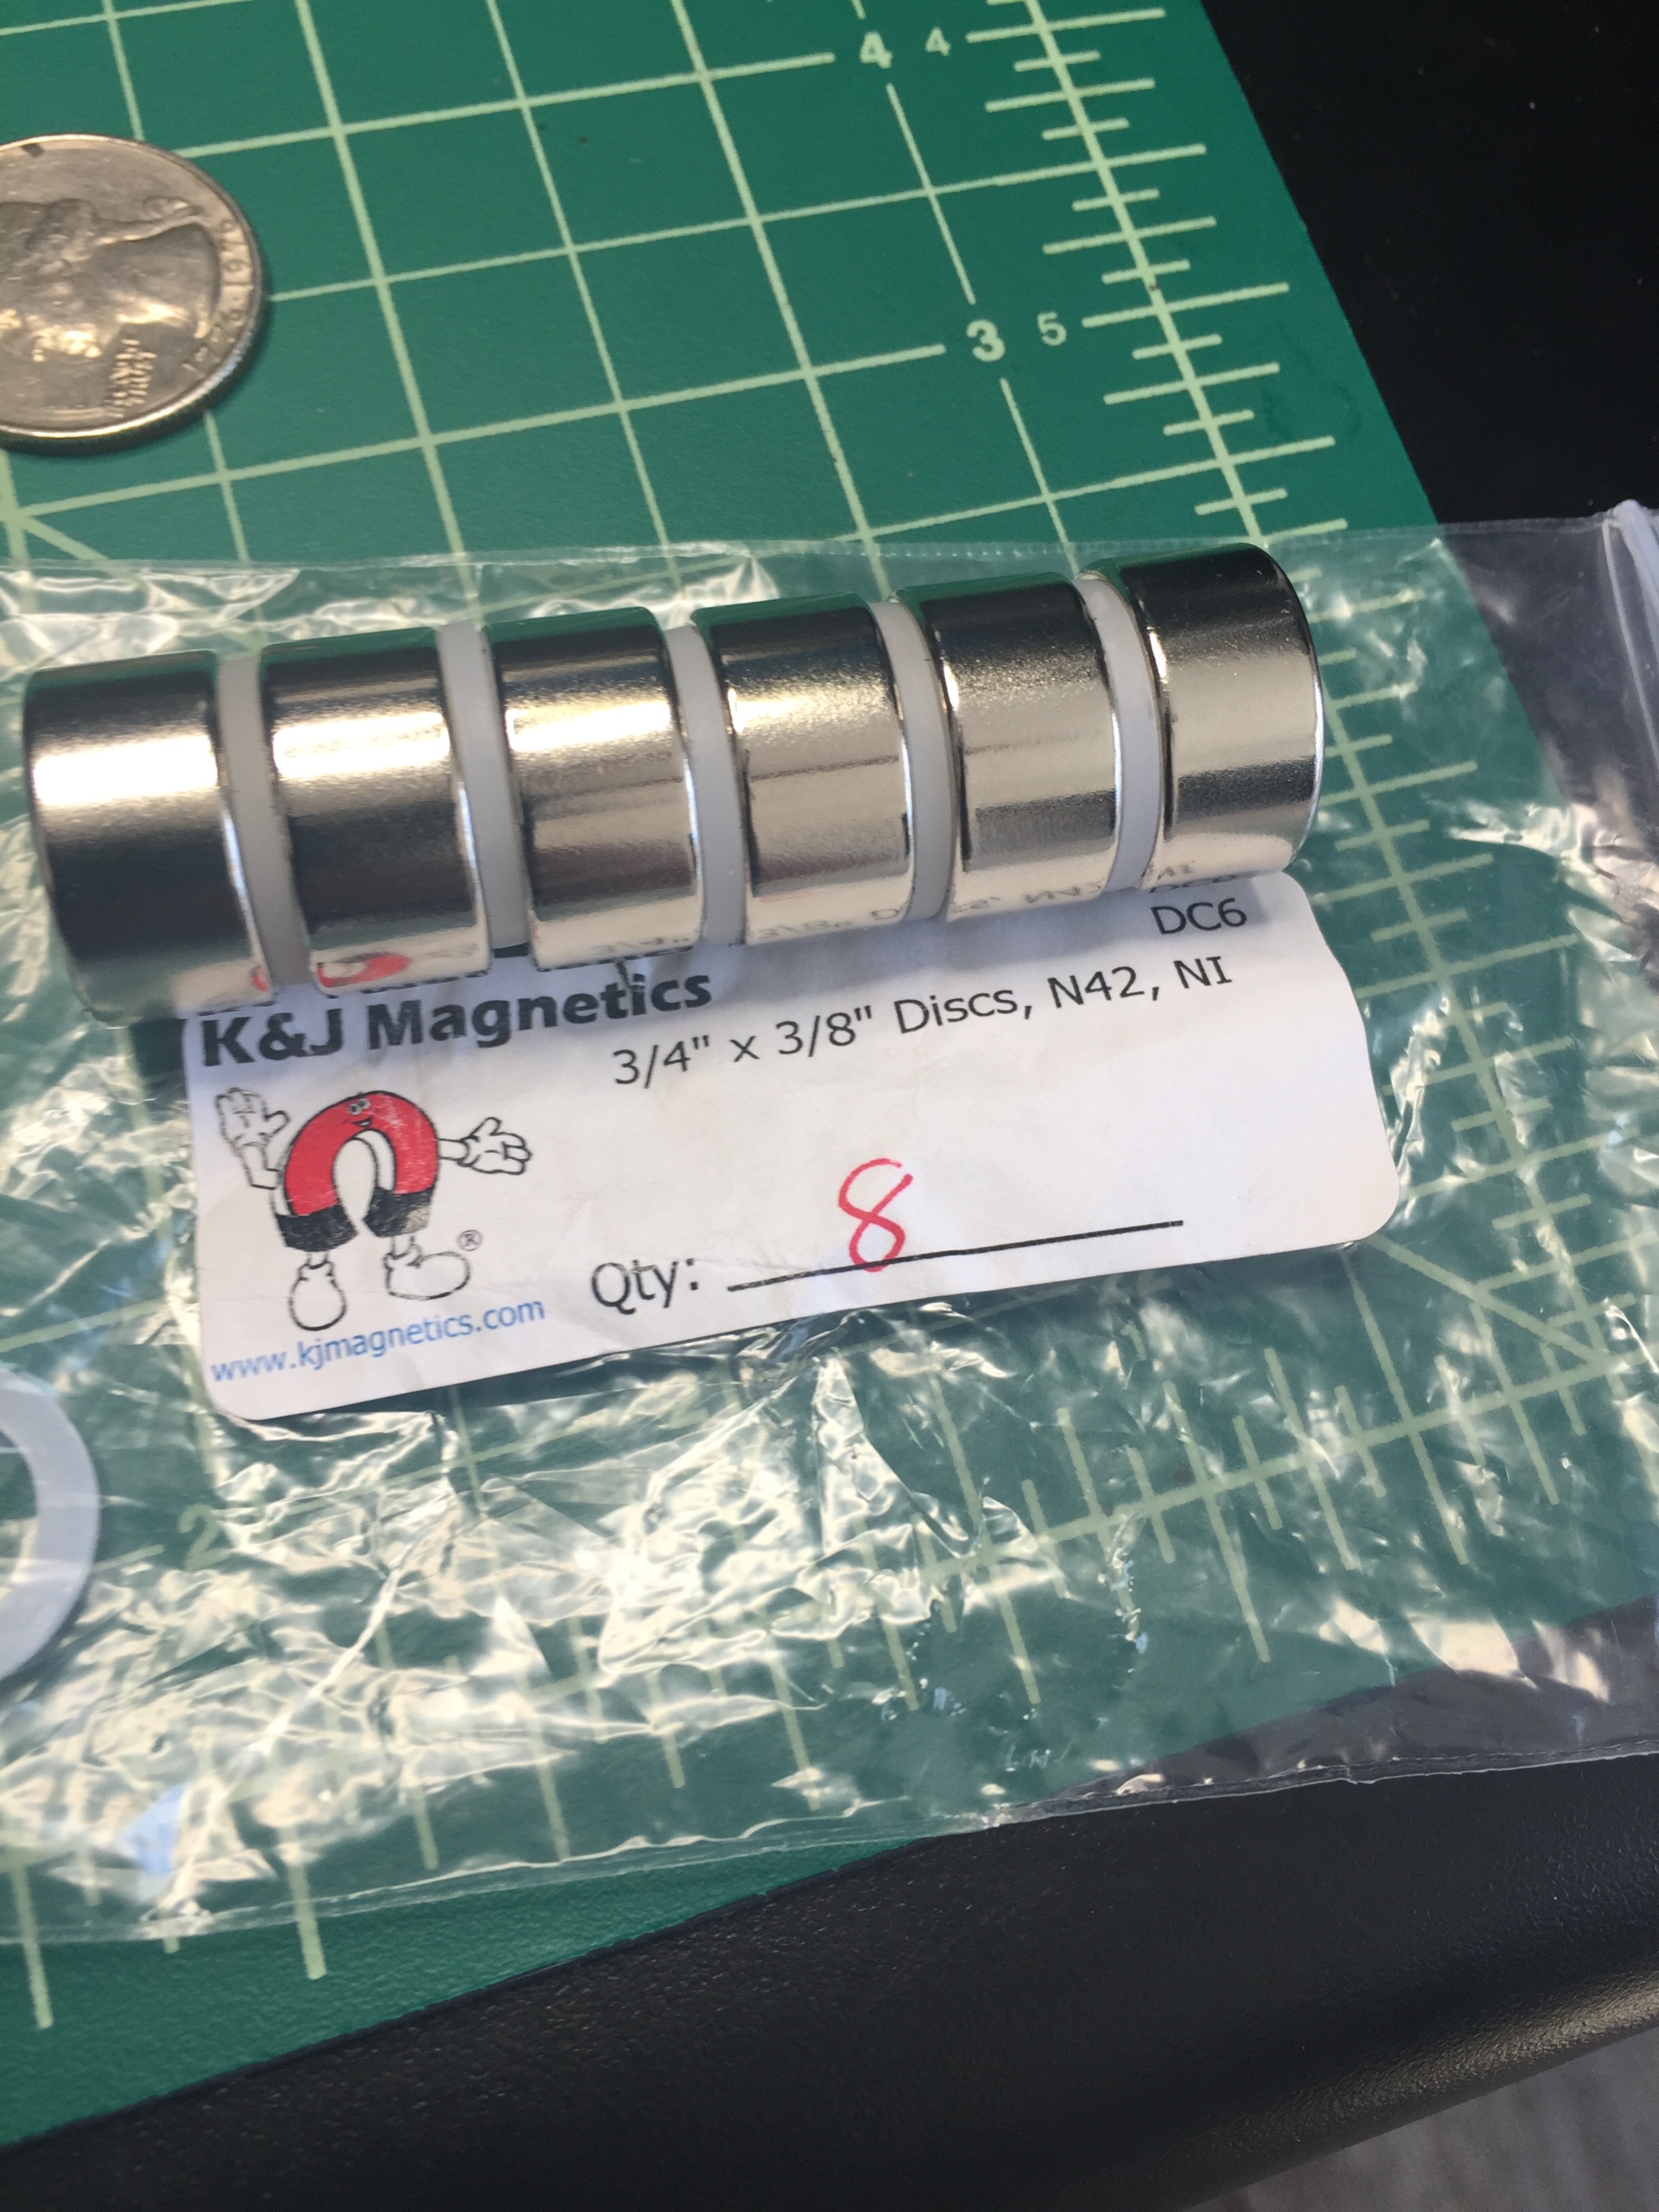
For magnetizing this beast, I went with much larger magnets than the Reaver.
So far, I’ve purchased 3/4″ diameter by 3/8″ thick neodymium magnets. These puppies have a pull force of around 24 pounds when it’s magnet to magnet.
I purchased magnets for four different joints
- Legs -> Torso
- Right shoulder -> Arm
- Left shoulder -> Arm
- Head -> Body
Here I’m using a 3/4″ Forstner bit to drill the hole for the lower magnet.

After the main hole is drilled, drill a few holes for the excess JBWeld epoxy to squirt out through. This means you can coat the hole liberally with JBWeld for good coverage, and then push down the magnet until it’s flush, and an excess JBWeld will push out through the tiny holes.

I also drilled through the top plate (bottom of the torso). It’s not 3/8″ thick, so I ended up drilling clean through (not pictured).
Here you can see the fully glued in leg/hip magnet
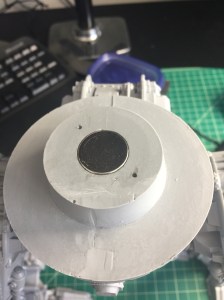
And the fully glued in torso magnet.

Because the torso plate was thinner than the magnet itself, I dumped quite a bit of JBWeld on top of the magnet to create plenty of support for the torso magnet so it doesn’t pull out when assembling/disassembling the torso from the legs. The fun thing about JBWeld is that it’s metallic & ferrous, so the magnet actually pulls the JBWeld towards it! I just kept adding JBWeld until it created a nice thick ‘cap’ around the top of the magnet.
So far (about a week, and probably 100 torso/leg attaches and detaches, both magnets are still 100% secure… so I don’t anticipate a risk of the magnets coming loose from the resin due to the strong 24 pound pull force.
Share this:

Warlord Titan Assembly – Hips, Legs & Pinning
This is potentially the most tricky part of the entire build. Unfortunately this step requires both hands so I wasn’t able to take any pictures during the operation but I did take a few pictures after the fact to demonstrate the bubble level and the final leg/feet positions.
To position the legs on the hips and the feet on the legs I:
- Used JBQuick instead of JBWeld
- Did one leg at a time, and manually held the leg in the ball joint of the hip for ~10 minutes.
- Did the leg/hip join before gluing the feet on, but positioned the leg in the ‘cup’ of the foot while the hip/leg joint was setting to get an accurate idea of angle and height.
- While doing this, I used a small bubble level on top of the legs as I’m going for a level/stable hip surface.
- After each leg join set up after ~10 minutes, I did the same for the leg -> foot joint… I manually held the whole enchilada for ~10 minutes until the joint cured, then I repeated on the other leg/foot.

After letting the leg/feet joints fully cure (~12 hours) I drilled 1/8″ holes for the 1/8″ brass rods, to pin the leg/hip joints and reinforce everything so it’s nice and strong.
I’m a little concerned my legs have too wide of a stance, as the distance between the two connection points for the upper most piston is very tight, and even at max compression the pistons might be too long. I’ll update this outcome in a future post.
Overall, this is the hairiest / messiest part of the build as everything is at odd angles and it’s very difficult to clamp anything in. If/when you do this step, good luck! :) Hit me up with any questions / concerns and I’ll try and help.
Here you can see the legs clamped in the vice

Then, drilling as straight ‘up’ the leg as possible even though the foot itself is at an angle.

I repeated the same drilling step for the hips. Below you can see the final/glued pins for the feet and hips.


At this point I have pins all over the place… through each hip, through each foot, through/accross the knee, and between the lower leg and knee joint. A total of 8 pins (4 in each leg). This is probably massive overkill, as the resin is nice and sturdy/thick, but I don’t want to take any chances with this expensive/heavy beast!
Share this:

Warlord Titan Assembly – Legs and Knees
Step one of leg assembly is to epoxy the two pieces of the lower leg assemble together. I roughed up the joint surfaces and applied a liberal amount of JBWeld and let cure overnight(not pictured).
After the two lower leg pieces had cured, I put a 1/8″ brass rod pin through the join for good measure (probably unnecessary as JBWeld is strong and permanent, but I’m paranoid about leg strength on such a big, top heavy model. Below you can see where I pinned the lower leg pieces together. I drilled at an angle starting from the top of the armor support piece and down through the joint.

Below you can see the ejected JBWeld after I sunk the 1/8″ brass rod/pin. Not beautiful, but this part will be hidden by the lower leg armor plating.
Once everything dries overnight, drill a 1/8″ hole through the outer/upper knee joint.
If you try and drill all the way through both sides from just the side facing you there is a good chance that you aren’t drilling perfectly straight, or that the knee joint isn’t perfectly flat on the table, so your hole will be off center on the bottom joint. To avoid this I drilled in from both sides of each outer/upper knee joint to make sure that the hole is ‘centered’ on each side.
With the holes drilled on both of the outer/upper knee joint pieces, center the inner/lower knee joint as much as possible and mark the ‘center.’

If the center hole mark looks reasonable on the inner knee joint (it did) go ahead and drill through the entire inner knee joint through the outer piece facing you. Once you punch through the entire inner/lower joint, stop drilling as you already have a hole in the other side of the outer/upper knee joint.

There is enough play in the inner/outer knee joints… you should be able to test fit (no glue yet!) the 1/8″ brass rod through the entire knee joint.

Next, we need to decide what angle to glue the leg joints at. I decided to not get fancy… My goals for the Warlord Titan are not a dynamic running pose, but an imposing ‘standing my ground’ stance that is, most importantly, stable and strong.
As far as stability is concerned, I wanted to load to be ‘linear’ from the hip joint down through the legs to the feet. I used a straight edge from the center of the hip joint down through the center of the lower leg position, and noted the position of the knee joint (lug at 3rd line)

The next thing I was curious about was how much height I would gain/loose as I compressed the knee joint. As you can see below (inch measurements on the green mat) ‘lug at 3rd line’ was about 1/2″ taller than ‘lug at 4th line.’
I chose ‘lug at line 3’ knee positions for both knees for three reasons:
- I like the extra 1/2″ height. Stand tall titan! We’re not some crouching/stalking WarHound, we are a mighty warLORD!
- I like that the load from the hip joint will be ‘straight’ down through the lower leg
- I want a more static/stable pose as opposed to a walking running pose… mostly for stability but also story wise. This Warlord is right where it needs to be and has the enemies of the imperium in its sights.
- Static/Stable is less risk overall as there will be less risk of pistons being too long/short and less risk of the center of gravity being off and the warlord tipping over.


Now that I decided on my knee joint angle, I once again used JBWeld to glue those joints in. I applied a liberal amount to the inside of the upper leg, and then a thin-ish layer to the ‘cog’ coming up from the lower leg assembly. Once inserted, I sunk the 1/8″ brass rod pin through the knee joint, positioned the lug at ‘line 3’, cleaned up any of the JBWeld being pushed out of the knee joint with q-tips, and them clamped the joints down (light pressure from the clamps) to dry overnight.


Share this:

Warlord Titan: It’s the journey, not the destination.
Warlord Titan construction commences!

‘Step 1’ in the instruction manual… attaching the ‘ball’ to the hip joint (kind of an inverse femoral head for those willing to google hip anatomy). I scored the heck out of all the smooth flat surfaces of the join with an x-acto knife then liberally applied JB-Weld. I purchased the larger 5oz tubes of JB-Weld as I plan on using lots and lots of JB-Weld on this warlord. JB-Weld just feels a lot less brittle and a heck of a lot tougher than Cyanoacrylate (CA). It takes ~12 hours to cure, which also helps me SLOOOOW down on the build, enjoy it more and not make stupid mistakes because I’m trying to rush assembly.

These are ALL of the pistons on a warlord titan. For anyone that’s assembled a Reaver or Warhound, the small number is a HUGE RELIEF. I probably spent 20% of the entire build time of the warhound/reavers on the pistons.
Here are the completely trimmed pieces. All gate/vent resin has been cleanly removed. Any flash lines and mold misalignments removed with the GW mold line remover.

Probably the least fun part of prep is ‘THE CLEANING.’ To get clean casts, a mold release must be used. The whole point of mold release is to prevent other materials (the mold) from bonding to the part. The problem is that it also prevents PAINT from bonding to the resin, which is of course a huge problem on a Titan. So… a toothbrush, lots of dish soap and rinse water, lots of scrubbing, and 2-3 hours of time, and CLEAN! This step definitely gets old after 171 pieces (ugh). However, early on with ForgeWorld resin I skipped this step, and there’s nothing worse then removing a piece of very gently adhesive masking tape from a base coat and having the entire paint film pull up, ruining an almost complete model. I often skip this step with the games workshop injection molded plastics…but NEVER with resin. Trust me, it’s worth the time! I will also do one final soap/scrub/rinse once the entire model is put together right before priming.
A little advice/perspective on Titan building: It’s the journey, not the destination.
Once you realize this, Titan building is AMAZING. Every few nights for the next 3-4 months I will do ONE OR TWO STEPS of the assembly process, and each step will take 1-2 hours. I will get each step as perfect as possible… test fit it, re-test fit, sand, score, drill/pin, etc. Each morning I will wake up and have something small to look forward to. Like a little kid on christmas morning I’ll run down and ‘check my Titan.’ I’ll remove the clamps and confirm that the bond is strong and that everything is aligned correctly and looking great. It’s great! Stretching out the build over 3+ months help justify the cost and avoid a crappy outcome / build mistakes. If I spend 10-12 hours / week over 12-16 weeks = $1900 USD / 120 to 192 hours = $9.90/hour to $15.85/hour. And that’s just the build, so every time I field it in battle (rare) and every minute I see it on display in my office (often) adds to the value. It’s still ridiculously expensive, but what an amazing creation these things are!
Share this:

ForgeWorld Warlord Titan has arrived! Saevus Ultio!
For my 40th birthday gift to my self, I purchased a ForgeWorld Warlord Titan.
Titan #00065 has arrived! (or 1000001 in binary).
Saevus Ultio (Fierce Vengeance) will be joining Saevus Verum, Saevus Rex, and Saevus Juris of Legio Invictus.
The Warlord body (everything except for the weapons) is made up of 171 parts. That compares to 214 parts on the Reaver. Between the lower part count, the clean casts, and the lack of any interior detail to paint, I expect the build portion to take significantly less time the the Reaver.
The casts are much cleaner, and I ran into zero (so far) parts that will need replacing or even moderate reshaping. I’m not sure if that’s due to the low cast number (65 instead of 1108) or if ForgeWorld switched to a CAD/3D printing design process (guessing), or both. The reason I strongly suspect CAD is the instructions, which have beautiful and obviously rendered 3D representations of each piece, as opposed to photographed pieces seen in earlier ForgeWorld kits.
Build pictures to come!

Share this:

2k Astra Militarum vs. Necrons
I played a 2k point game with Matt from At Ease Games here in San Diego.
Was a fun game and I learned a lot.
At the bottom of turn four I was getting decimated in close combat, but had earned enough objective points getting lucky with tactical objectives and actually won the game!


Share this:

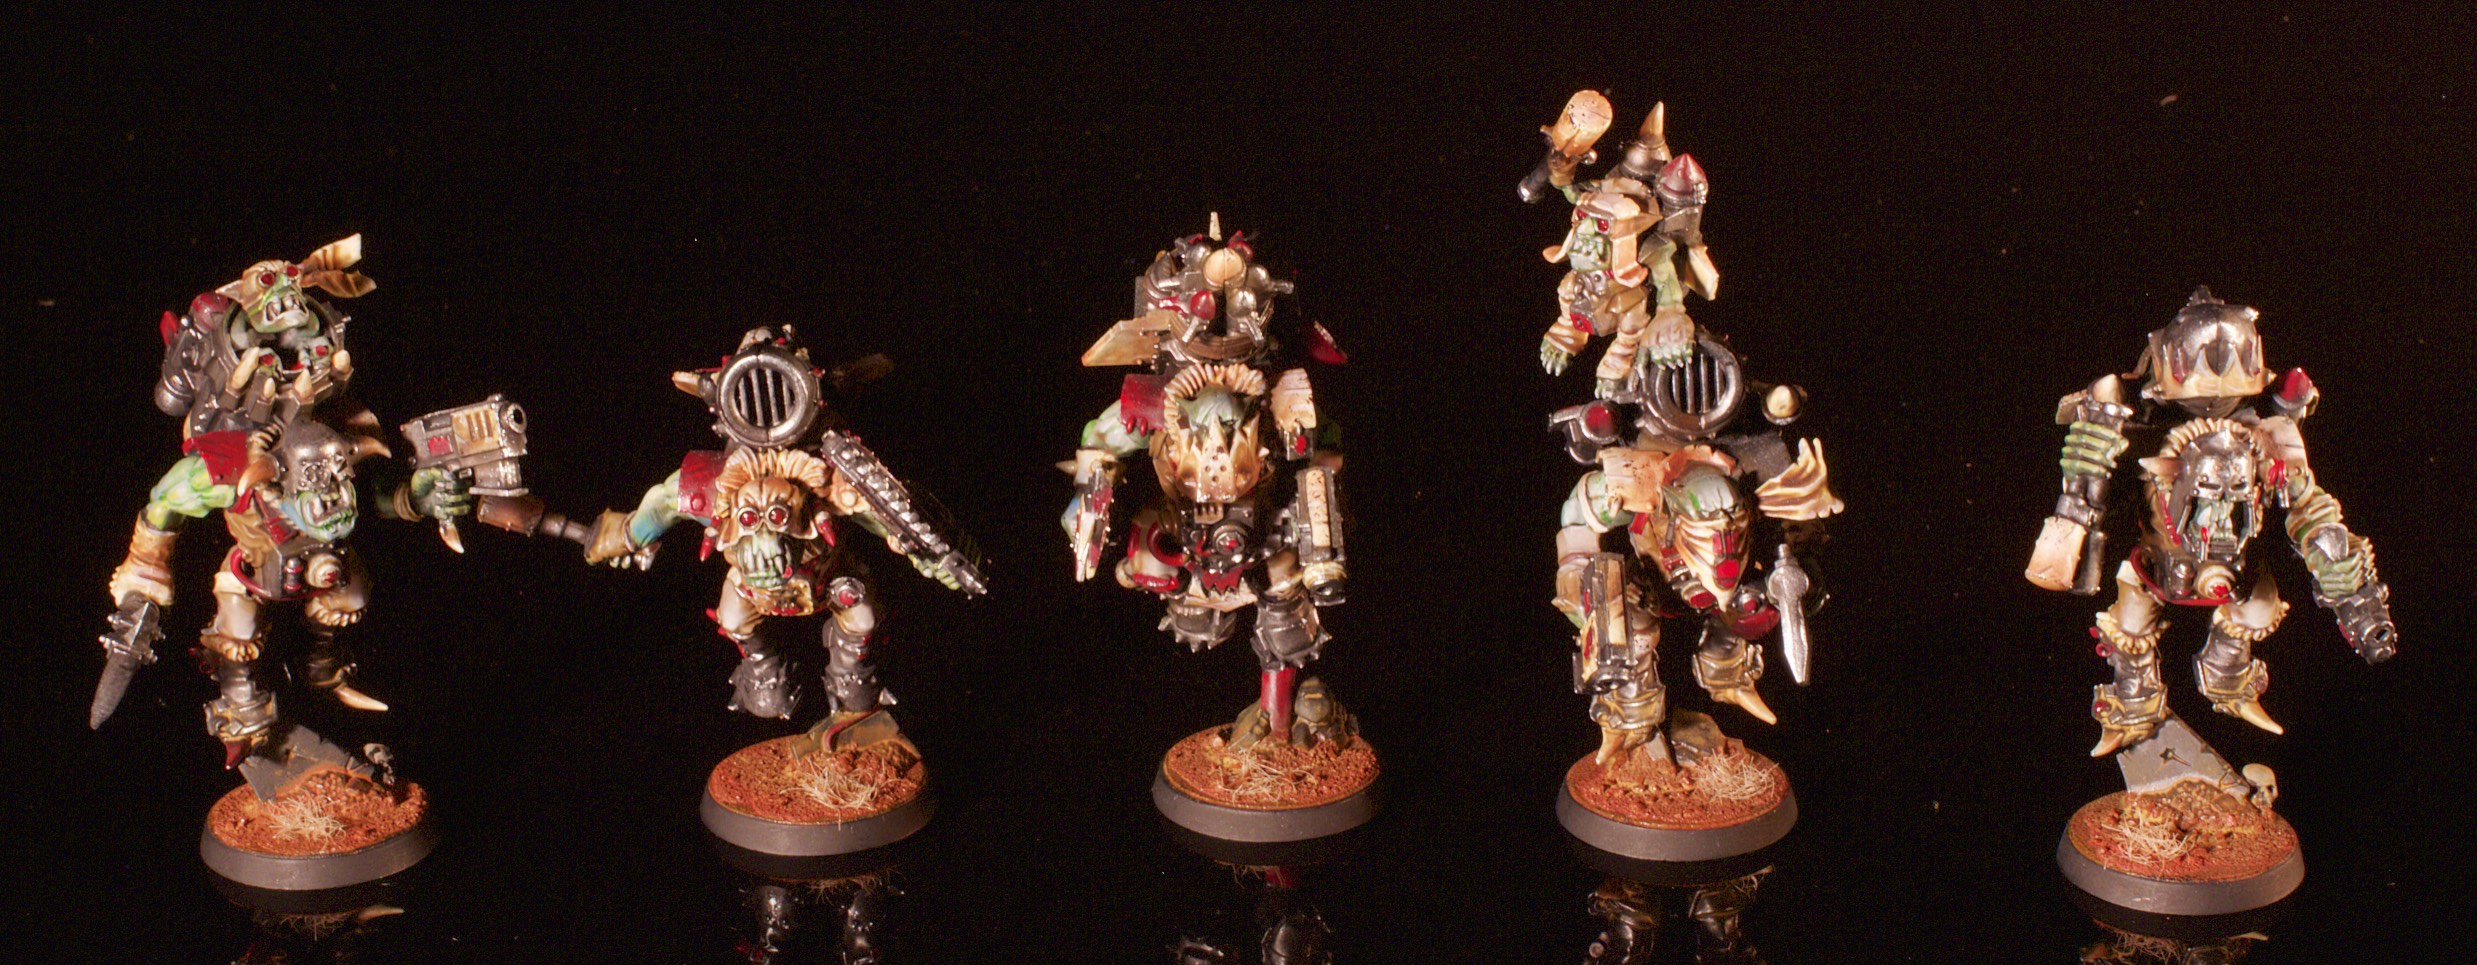
Ork Big Mekk with Shokk Attack

I purchased these from Fabrice Tran (France) in late 2013. Whenever I need to learn a technique on my armies I stare at these and try and replicate. You can find additional pictures of these models on Fabrice’s website. His commissions are spendy, but beautiful, and he’s won 7 golden demons from 2002 – 2012!
Share this:

Ork Deff Dread

I purchased these from Fabrice Tran (France) in late 2013. Whenever I need to learn a technique on my armies I stare at these and try and replicate. You can find additional pictures of these models on Fabrice’s website. His commissions are spendy, but beautiful, and he’s won 7 golden demons from 2002 – 2012!
Share this:

Ork Nob with Bosspole

I purchased these from Fabrice Tran (France) in late 2013. Whenever I need to learn a technique on my armies I stare at these and try and replicate. You can find additional pictures of these models on Fabrice’s website. His commissions are spendy, but beautiful, and he’s won 7 golden demons from 2002 – 2012!
Share this:

Ork Warbikers


I purchased these from Fabrice Tran (France) in late 2013. Whenever I need to learn a technique on my armies I stare at these and try and replicate. You can find additional pictures of these models on Fabrice’s website. His commissions are spendy, but beautiful, and he’s won 7 golden demons from 2002 – 2012!
Share this:

Ork Warbosses


I purchased these from Fabrice Tran (France) in late 2013. Whenever I need to learn a technique on my armies I stare at these and try and replicate. You can find additional pictures of these models on Fabrice’s website. His commissions are spendy, but beautiful, and he’s won 7 golden demons from 2002 – 2012!
Share this:

Ork Shoota Boyz


I purchased these from Fabrice Tran (France) in late 2013. Whenever I need to learn a technique on my armies I stare at these and try and replicate. You can find additional pictures of these models on Fabrice’s website. His commissions are spendy, but beautiful, and he’s won 7 golden demons from 2002 – 2012!
Share this:

Ork Boyz


I purchased these from Fabrice Tran (France) in late 2013. Whenever I need to learn a technique on my armies I stare at these and try and replicate. You can find additional pictures of these models on Fabrice’s website. His commissions are spendy, but beautiful, and he’s won 7 golden demons from 2002 – 2012!
Share this:

Ork Gretchin

I purchased these from Fabrice Tran (France) in late 2013. Whenever I need to learn a technique on my armies I stare at these and try and replicate. You can find additional pictures of these models on Fabrice’s website. His commissions are spendy, but beautiful, and he’s won 7 golden demons from 2002 – 2012!
Share this:

Ork Lootas
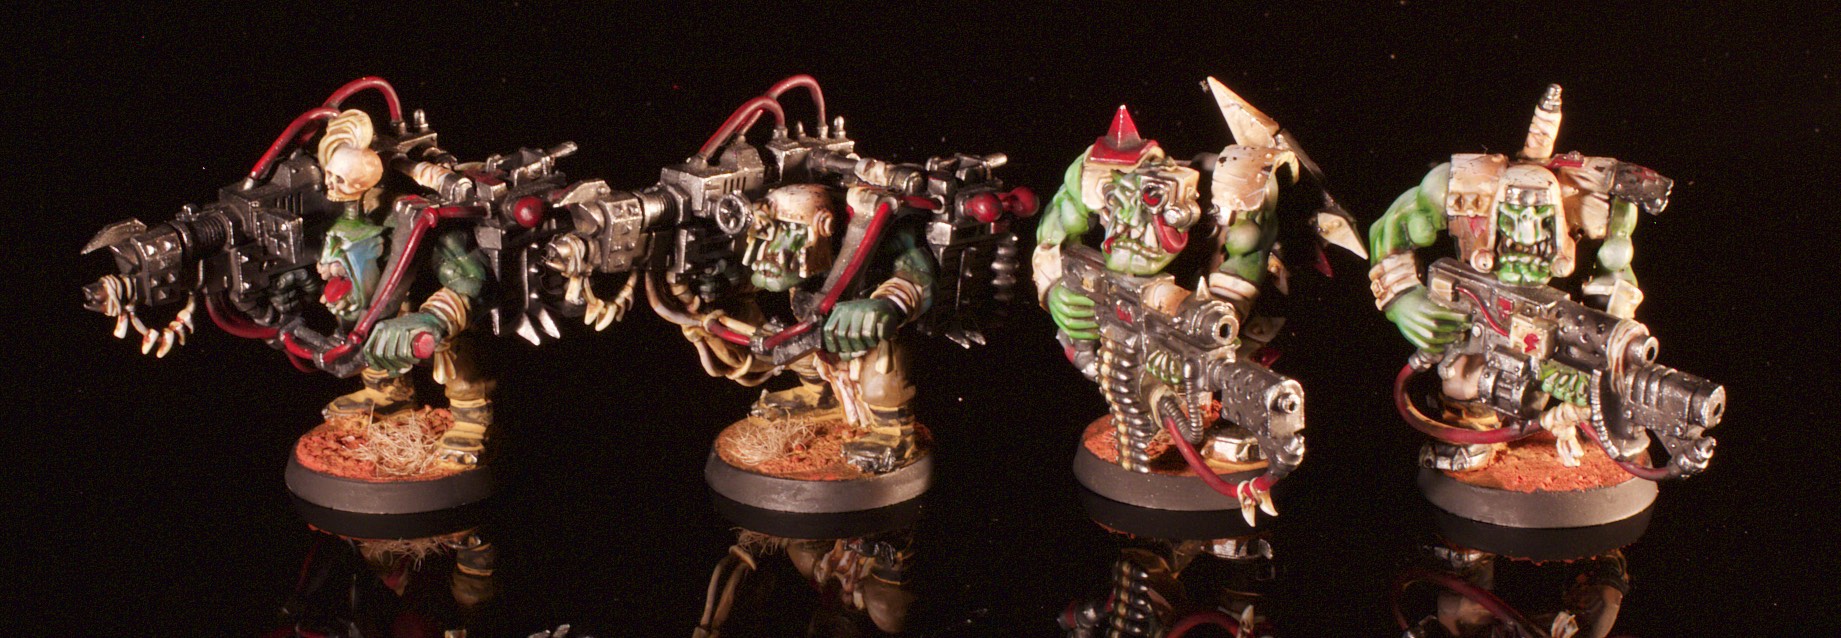

I purchased these from Fabrice Tran (France) in late 2013. Whenever I need to learn a technique on my armies I stare at these and try and replicate. You can find additional pictures of these models on Fabrice’s website. His commissions are spendy, but beautiful, and he’s won 7 golden demons from 2002 – 2012!
Share this:

Ork Boss Zagstruk

I purchased these from Fabrice Tran (France) in late 2013. Whenever I need to learn a technique on my armies I stare at these and try and replicate. You can find additional pictures of these models on Fabrice’s website. His commissions are spendy, but beautiful, and he’s won 7 golden demons from 2002 – 2012!
Share this:

Ork Nobs, Runtherd, and Painboy


I purchased these from Fabrice Tran (France) in late 2013. Whenever I need to learn a technique on my armies I stare at these and try and replicate. You can find additional pictures of these models on Fabrice’s website. His commissions are spendy, but beautiful, and he’s won 7 golden demons from 2002 – 2012!
Share this:

Ork Stormboyz


I purchased these from Fabrice Tran (France) in late 2013. Whenever I need to learn a technique on my armies I stare at these and try and replicate. You can find additional pictures of these models on Fabrice’s website. His commissions are spendy, but beautiful, and he’s won 7 golden demons from 2002 – 2012!
Share this:

Ork Battlewagons


I purchased these from Fabrice Tran (France) in late 2013. Whenever I need to learn a technique on my armies I stare at these and try and replicate. You can find additional pictures of these models on Fabrice’s website. His commissions are spendy, but beautiful, and he’s won 7 golden demons from 2002 – 2012!

