
New Mini Studio – 3 Point Lighting

Finally got my semi-permanent mini studio set up.
- 3x Manfrotto Heavy-Duty Flex Arms (237HD)
- 4x Manfrotto Super Clamps (035RL)
- 1x Manfrotto Magic Arm (244)
- 3x LimoStudio Continuous LED Portable Light
- 1x Tablewar Macromat Set
The Manfrotto gear isn’t cheap, but I’ve been collecting a piece here and there for decades. Buy it once, use it for life.
One of the super clamps I bought in 1995 (~23 years ago!)
The LimoStudio Continuous LED Portable lights are super cheap fixtures that hold off the shelf GU10 base LED bulbs. They are non-dimmable so I’m using improvised ‘gels’ (plastic cut from a plastic yogurt container!) to soften/dim the lights a bit. I had to jury rig a tripod mounting screw using these adapters. The lights are el-cheapo, and I’ll play around with some off the shelf GU10 LED bulbs. Ideally I’ll find a small, relatively inexpensive, A/C, dimmable housing with a 3/8th – 16 mount.t
This is a basic ‘Three-Point Lighting‘ setup and my key light is way too bright.
Share this:

Warlord Titan – More caution stripes!
For some reason, I got it in my head that the carapace top between the reactor ridges would be cool as black/yellow caution stripes.
Of course it’s one of the hardest areas to mask easily, but I couldn’t get it out of my head, so here goes!
First, about 45 minutes of careful masking with Tamiya masking tape.

Then about 30 (or was it 50?) light coats of Wicked Golden Yellow. If you spray this too thick it pools up and dries unevenly, so many many thin coats is the name of the game.

Hit the knee pads while I had the paint in the cup.

Completed base yellow coat, drying overnight.

Sprayed 3 layers of liquitex Glossy varnish so the base yellow would be less likely to come up with the masking tape.

about 20 minutes into the stripe masking job. Because of all the rivets I was sure I was going to get ‘leaks’ of black paint under the taps, so resolved to lay down very, very light coats of black (which dry upon contact and are less likely to ‘run’ under the tape.

and more masking

and more masking

and then paint! about 10 very light coats of Vellejo black primer.
The moment of truth when airbrushing over masks/stencils is removing the mask. Will the paint peel up? how are the mask edges? any leaks? Basically, any black paint over yellow is almost impossible to repair because of hour transparent the yellow paint is… it’d never truly cover the black and look smooth.
Fortunately, the paint stayed down nicely because of my varnish, and the light coats of black paid off, no issues at all with the stripes! yay!

peeling away more mask, still looking good.


stripe mask completely removed, looking good so far!
So I applied 2 coats of varnish, so the masking tape I have to put on top of the whole area when priming the rest of the model silver doesn’t pull up the yellow/black I just spent so much time laying down.

So, in my jubilation, I pulled off the ‘outer mask and pulled up some of my caution striping in my rush. NOOOOOOOoooo!

So, another quick mask

and many layers of Createx wicked yellow


and it’s more or less repaired. There’s a bit more color saturation and an textured edge on the joint, but better than primer grey!

And that is a day of painting. So. Much. Masking.
Warlord Titan – Painting the Legs Part II
Next, let’s do some caution stripe pistons!
Yellow is a PITA, even with an airbrush. Below is about 35 coats of Createx Wicked Golden Yellow (W011). I thinned with W100 reducer, although I just ordered W500 reducer, which I’m super excited about as it’s supposed to be way better. W100 can cause cratering, tip drying, dries slowly, and dires glossy.
W500 claims to address these issues which would make Createx Wicked Colors my main paint for basically everything.

Airbrushing models like this is 90% masking, 5% paint prep, and 5% actually airbrushing. Give in to this fact. Just surrender. Trust me.
I used 1/8″ 3m vinyl tape, which is good for really sharp edges, but a bit too sticky (risk of pulling up paint).
To combat this, I laid down three layers of Liquitex Gloss Varnish and let dry overnight. The gloss varnish toughens up the finish and makes the tape pull up without tearing the paint film. If you don’t have existing tape to use up, I’d recommend 3mm Tamiya masking tape, either the regular yellow stuff or the new white ‘for curves’ variety although I haven’t tried that yet.


After a few hours of masking, about 10 minutes of very light coats of Vallejo Black Primer which is one of my favorite paints of all time, as it shoots through my Iwata HP-BCS Airbrush with the 0.5mm setup like a dream, has great adhesion, and a great matte finish.

Caaaaarefully pulling up the tape.

Starting to apply a brown undercoat to the trim. This is actually P3 Bootstrap leather, my favorite brown paint.


I’m trying the new Games Workshop golds and I HATE THEM. They are super chunky. Applied lightly they give like 2% coverage and would take 50 coats. Applied liberally, they pool up and dry with an uneven, chunky texture. After searching online, I’m going to try Citadel ‘Retribution Armor’ gold base, which is supposed to act like the older Citadel ‘Shining Gold’ Paint which I LOVED. Failing that, adding ‘Lahmian Medium’ is supposed to help the new metallic paints. Failing that, I’ll use Reaper/MSP 9050 Antique Gold which is a perfectly serviceable gold, just not as good as the old ‘Shining Gold.’

Here you can see the pistons painted and glued in. The second picture shows a piston that was clamped wrong, and dried in a tweaked position. :/ This is JBWeld, so once it’s glued, it’s glued. The Armor plates will make this mistake less obvious, but darn! :/

Not great lighting for these pics, but the warning stripe pistons on the warlord feet.


Warlord Titan – Painting the Legs Part I
I covered the primed lower torso with Citadel Lead Belcher spray.

Then, I liberally applied buckets of Nuln Oil to the lower torso. It was messy… nuln oil was spattering all across my cutting mat, and citadel washes have a certain less than pleasant smell. It’s winter here and there are no flies, but somehow, somewhere, father Nurgle hatched a housefly just for me and I witnessed a fly buzzing around the drying nuln oil. I wonder what that stuff is made of…


Once the nuln oil dried (overnight, with the flies) I laid down a very light coat of waywatcher green glaze. The trick here is to not let it pool up, where it’ll look bright green. We’re just going for a slight tint to add some depth to the metal. If you really want to go crazy, you can actually add multiple tints (maybe a magenta) and make the metal even more complex.


After the glaze dries (pretty fast, a few minutes) it’s time to dry brush about half a pot of necron compound.


And that’s the basic metallic finish I’m using for the titan legs. 5 coats. Primer + Lead Belcher Spray + Nuln Oil + Waywatcher Green + Necron Compound dry brush. I sixth coat of the magenta glaze/tint would add more awesomeness.
Below I’m applying the same steps to the main leg pistons, plus the beginnings of the warning stripes.
I used the citadel Led Belcher Air to hit the back of the leg pistons (after masking the fronts)


Then I threw down the Nuln Oil

Masked Even More (PITA)

Then, I sprayed Creatix wicked Golden Yellow. For some reason of physics I don’t understand, yellows are always a complete pain the butt. It took about 30 coats to get the color saturation required without pooling/orange peeling the pigments.

And here is is a picture of my ArtoGraph 1520 Spray Booth but with the metal hood, which I don’t see on the artograph website any more.
So…much…painting…left. YAY! :)
Share this:

Warlord Titan Head LED lighting
My other titans have LED lighting in the cockpit, and I can’t have my biggest, baddest titan without!
Goals:
- Lighting in the warlord Titan, to compliment (but not match) my reaver and two warhounds
- Slightly less bright LEDs that the others… so I can photograph the warlord with the LEDs on w/o blowing out the exposure on the pictures.
- Replaceable LEDs in case they fail or I want to change the brightness/color.
- Removable battery/switch, such that when the battery is not installed it doesn’t add a huge clumsy artifact to the model
- Doesn’t obstruct anything in the cockpit, both Moderati and the Princeps still need to fit.
- Allows the head to be detached from the main body (magnetized) so I can purchase additional heads/cockpits and swap them out.
You can see how I achieved those goals below. I wired through the main torso with 24 gauge wire I had on hand… it’s pretty heavy wire for this appliucation, and if I were to special order wire I’d probably go with 26 or even 28 gauge wire. It would have been a bit more fragile but easier to route in the cockpit.
I crimped the connectors using the ‘PA-09’ crimping tool, which is a must for making your own connectors with smaller gauge wire. I happen to have all this gear because two of my other hobbies (drones and Arduino/physical computing/IoT)
Drilling the holes for the nylon LED holders was a bit dodgy as it just feels wrong drilling out detail on a model like this. Because we can buy the heads separately it’s much less nerve racking, as a mistake mean you ruin/degrade a $88 head instead of a $1800 complete titan. Still sketchy, but thank you ForgeWorld for selling the heads separately!


Here is a screen capture of the digikey order for the JST connectors. I bought a (lot) extra and JST connectors are just really handy to have on hand.

The black LED holders are digikey part number 67-1330-ND, and are ‘holder LED panel 3mm black nylon’ from ‘lumex opto/components inc’
The LEDs I used are digikey part number 516-2328-ND, AND ARE ‘LED 3MM Alingap Hi Perf Amber’ from ‘Avago Technologies US Inc)
I don’t have the part number of the resistors or battery pack. Adafruit has a nice iphone app ‘circuit playground’ that lets you choose the right resistors based on the ‘forward & supply voltage and forward current. I think the battery pack came from SparkFun. It’s 2xAA, which is pretty big, so I might switch over to a small LiPo battery or a 2xAAA solution in the future. The whole reason I connected everything up with the JST connectors is so I can swap stuff out later. I might build something warhammer-ish with existing bitz around a lipo pack and paint it up so it looks more integrated in the future.
So far I’m happy with it. One optimization would be to miniaturize the connectors and the battery solution to make them less obvious on the finished model. I went with an external battery pack because there is no accessible ‘inside’ on the warlord like the warhound/reaver, .
The Emperor Protects! Praise the Omnissiah!
Share this:

Forgeworld Warlord Titan Torso Build
For all of the below steps, I used good old JBWeld. Here you can see the two steps of mixing up the epoxy. First squeeze out relatively equal amounts of hardener (White-ish line) and ‘steel’ (dark grey). I pop off the end of a q-tip and mix the epoxy until it’s consistently grey.

Here’s a test fit of the major pieces before the upper right rear torso is glued in place.
I rough up all of the joint surfaces with an x-acto blade, and put red dots on all the surfaces that require glue so I don’t miss any surfaces or put down glue on something that isn’t supposed to have it.
Here’s me clamping in the upper rear torso.
This is where I made a slight mistake…the upper rear torso wasn’t aligned perfectly (it sagged a bit ‘low’) and this created a miss-alignment in the torso block.

Below you can see the misalignment. The middle inner ‘vent box’ is too low. The trick to to get the ‘upper rear torso’ glued in at exactly the right height. If I were to do it again, I’d glue in at least one of the ‘upper torso’ sides first so I could line up the ‘upper rear torso’ pieces correctly.

Preparing to glue the torso front plate. Again, roughing up the bonding surfaces with an x-acto knife and adding red dots so I apply JBWeld to the right surfaces.
Side view of the torso being clamped while the JBWeld is curing. I put the top plate on even though it wasn’t being glued in to make sure the sides cured at the right angle.

Front view of the torso sides being clamped while the JBWeld is curing. At this stage the front plate isn’t glued in…it’s just sitting in there to line everything up.

Top View of the torso box being glued together.

Before gluing the top plate on, I ran 4 wires through the lower torso, for 2x LED lights in the cockpit.

Relatively tricky placement of the clamps to glue on the Carapace front.

Carapace front being JBWelded on with the tricky clamps.

Clamps securing the exhaust vents.

gluing the exhaust intakes to the exhaust ridgets.

Gluing the exhaust ridges to the top carapace

Exhaust ridge clamps
And that’s the major pieces of the “Torso Box”
Share this:

Warlord Titan Assembly – Magnetizing the Torso
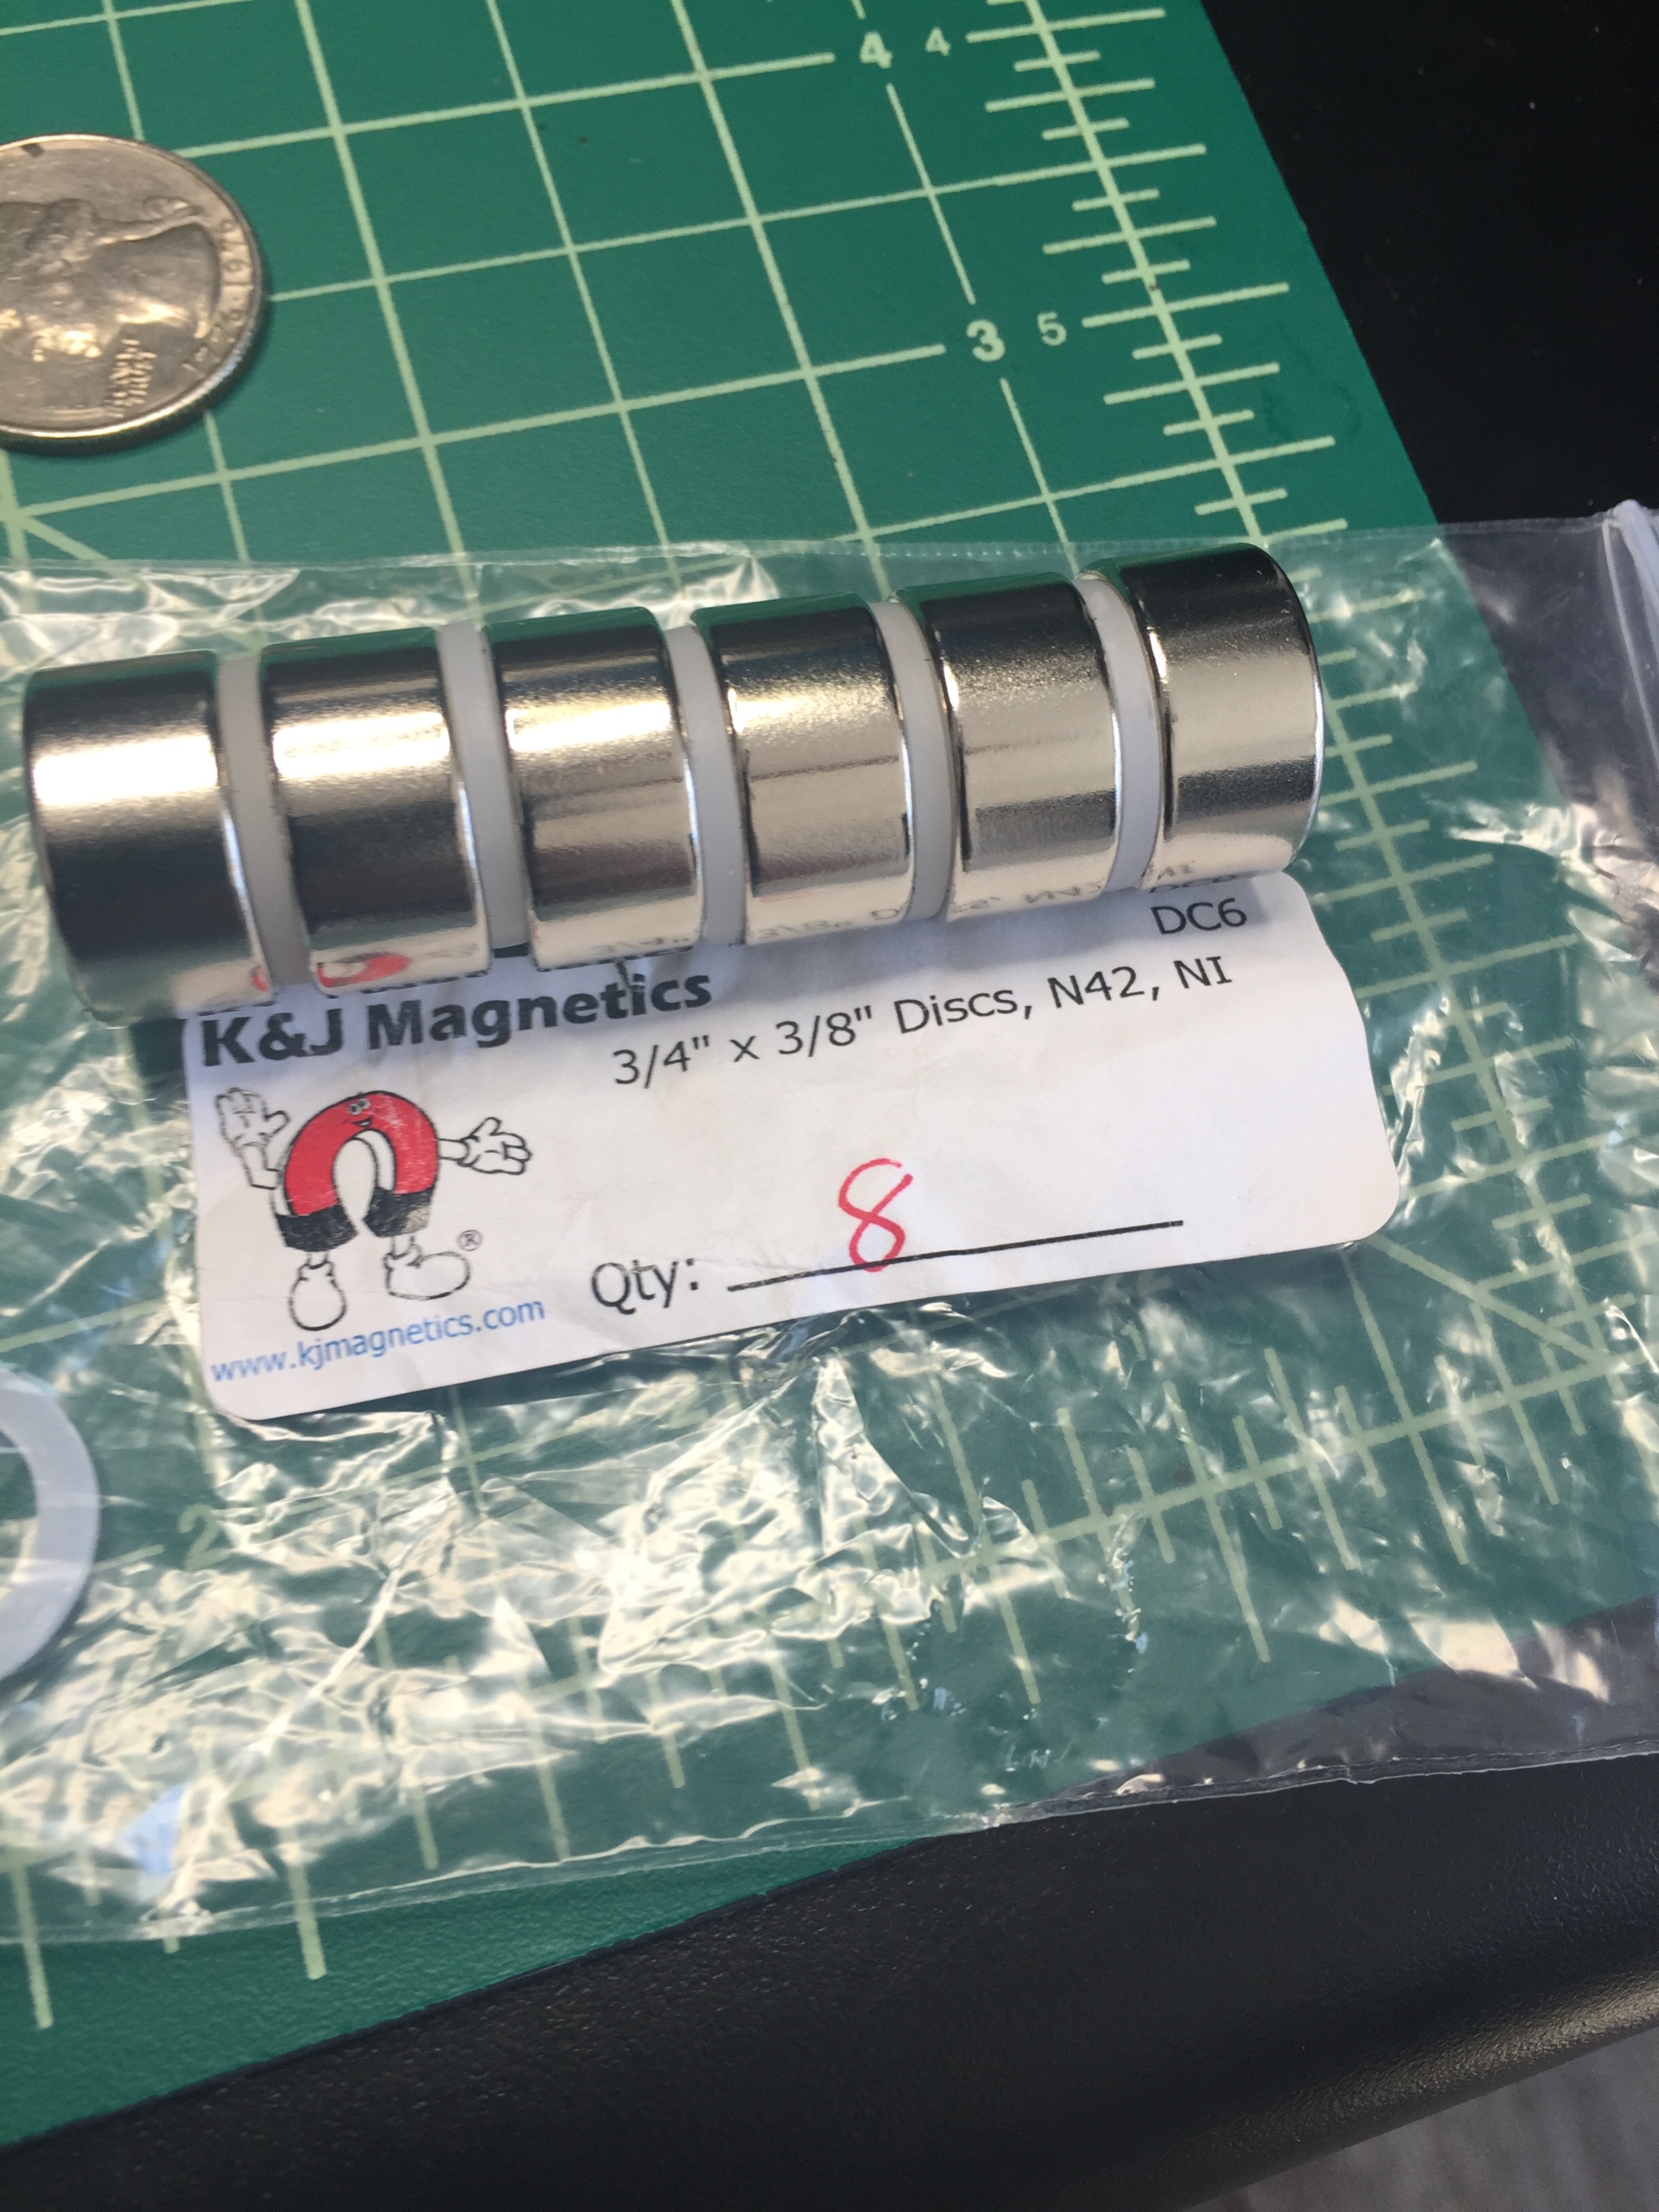
For magnetizing this beast, I went with much larger magnets than the Reaver.
So far, I’ve purchased 3/4″ diameter by 3/8″ thick neodymium magnets. These puppies have a pull force of around 24 pounds when it’s magnet to magnet.
I purchased magnets for four different joints
- Legs -> Torso
- Right shoulder -> Arm
- Left shoulder -> Arm
- Head -> Body
Here I’m using a 3/4″ Forstner bit to drill the hole for the lower magnet.

After the main hole is drilled, drill a few holes for the excess JBWeld epoxy to squirt out through. This means you can coat the hole liberally with JBWeld for good coverage, and then push down the magnet until it’s flush, and an excess JBWeld will push out through the tiny holes.

I also drilled through the top plate (bottom of the torso). It’s not 3/8″ thick, so I ended up drilling clean through (not pictured).
Here you can see the fully glued in leg/hip magnet
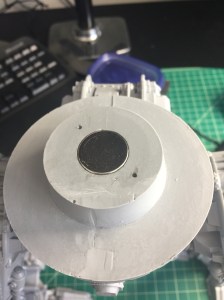
And the fully glued in torso magnet.

Because the torso plate was thinner than the magnet itself, I dumped quite a bit of JBWeld on top of the magnet to create plenty of support for the torso magnet so it doesn’t pull out when assembling/disassembling the torso from the legs. The fun thing about JBWeld is that it’s metallic & ferrous, so the magnet actually pulls the JBWeld towards it! I just kept adding JBWeld until it created a nice thick ‘cap’ around the top of the magnet.
So far (about a week, and probably 100 torso/leg attaches and detaches, both magnets are still 100% secure… so I don’t anticipate a risk of the magnets coming loose from the resin due to the strong 24 pound pull force.
Share this:

Warlord Titan Assembly – Hips, Legs & Pinning
This is potentially the most tricky part of the entire build. Unfortunately this step requires both hands so I wasn’t able to take any pictures during the operation but I did take a few pictures after the fact to demonstrate the bubble level and the final leg/feet positions.
To position the legs on the hips and the feet on the legs I:
- Used JBQuick instead of JBWeld
- Did one leg at a time, and manually held the leg in the ball joint of the hip for ~10 minutes.
- Did the leg/hip join before gluing the feet on, but positioned the leg in the ‘cup’ of the foot while the hip/leg joint was setting to get an accurate idea of angle and height.
- While doing this, I used a small bubble level on top of the legs as I’m going for a level/stable hip surface.
- After each leg join set up after ~10 minutes, I did the same for the leg -> foot joint… I manually held the whole enchilada for ~10 minutes until the joint cured, then I repeated on the other leg/foot.

After letting the leg/feet joints fully cure (~12 hours) I drilled 1/8″ holes for the 1/8″ brass rods, to pin the leg/hip joints and reinforce everything so it’s nice and strong.
I’m a little concerned my legs have too wide of a stance, as the distance between the two connection points for the upper most piston is very tight, and even at max compression the pistons might be too long. I’ll update this outcome in a future post.
Overall, this is the hairiest / messiest part of the build as everything is at odd angles and it’s very difficult to clamp anything in. If/when you do this step, good luck! :) Hit me up with any questions / concerns and I’ll try and help.
Here you can see the legs clamped in the vice

Then, drilling as straight ‘up’ the leg as possible even though the foot itself is at an angle.

I repeated the same drilling step for the hips. Below you can see the final/glued pins for the feet and hips.


At this point I have pins all over the place… through each hip, through each foot, through/accross the knee, and between the lower leg and knee joint. A total of 8 pins (4 in each leg). This is probably massive overkill, as the resin is nice and sturdy/thick, but I don’t want to take any chances with this expensive/heavy beast!
Share this:

Warlord Titan Assembly – Legs and Knees
Step one of leg assembly is to epoxy the two pieces of the lower leg assemble together. I roughed up the joint surfaces and applied a liberal amount of JBWeld and let cure overnight(not pictured).
After the two lower leg pieces had cured, I put a 1/8″ brass rod pin through the join for good measure (probably unnecessary as JBWeld is strong and permanent, but I’m paranoid about leg strength on such a big, top heavy model. Below you can see where I pinned the lower leg pieces together. I drilled at an angle starting from the top of the armor support piece and down through the joint.

Below you can see the ejected JBWeld after I sunk the 1/8″ brass rod/pin. Not beautiful, but this part will be hidden by the lower leg armor plating.
Once everything dries overnight, drill a 1/8″ hole through the outer/upper knee joint.
If you try and drill all the way through both sides from just the side facing you there is a good chance that you aren’t drilling perfectly straight, or that the knee joint isn’t perfectly flat on the table, so your hole will be off center on the bottom joint. To avoid this I drilled in from both sides of each outer/upper knee joint to make sure that the hole is ‘centered’ on each side.
With the holes drilled on both of the outer/upper knee joint pieces, center the inner/lower knee joint as much as possible and mark the ‘center.’

If the center hole mark looks reasonable on the inner knee joint (it did) go ahead and drill through the entire inner knee joint through the outer piece facing you. Once you punch through the entire inner/lower joint, stop drilling as you already have a hole in the other side of the outer/upper knee joint.

There is enough play in the inner/outer knee joints… you should be able to test fit (no glue yet!) the 1/8″ brass rod through the entire knee joint.

Next, we need to decide what angle to glue the leg joints at. I decided to not get fancy… My goals for the Warlord Titan are not a dynamic running pose, but an imposing ‘standing my ground’ stance that is, most importantly, stable and strong.
As far as stability is concerned, I wanted to load to be ‘linear’ from the hip joint down through the legs to the feet. I used a straight edge from the center of the hip joint down through the center of the lower leg position, and noted the position of the knee joint (lug at 3rd line)

The next thing I was curious about was how much height I would gain/loose as I compressed the knee joint. As you can see below (inch measurements on the green mat) ‘lug at 3rd line’ was about 1/2″ taller than ‘lug at 4th line.’
I chose ‘lug at line 3’ knee positions for both knees for three reasons:
- I like the extra 1/2″ height. Stand tall titan! We’re not some crouching/stalking WarHound, we are a mighty warLORD!
- I like that the load from the hip joint will be ‘straight’ down through the lower leg
- I want a more static/stable pose as opposed to a walking running pose… mostly for stability but also story wise. This Warlord is right where it needs to be and has the enemies of the imperium in its sights.
- Static/Stable is less risk overall as there will be less risk of pistons being too long/short and less risk of the center of gravity being off and the warlord tipping over.


Now that I decided on my knee joint angle, I once again used JBWeld to glue those joints in. I applied a liberal amount to the inside of the upper leg, and then a thin-ish layer to the ‘cog’ coming up from the lower leg assembly. Once inserted, I sunk the 1/8″ brass rod pin through the knee joint, positioned the lug at ‘line 3’, cleaned up any of the JBWeld being pushed out of the knee joint with q-tips, and them clamped the joints down (light pressure from the clamps) to dry overnight.


Share this:

125 Models On the Table!

This is easily the most models I’ve ‘batched’ at one time. I’m using a Kanban board approach with the following tasks… (still adding more tasks!)
- airbrush: base coat w/ Vallejo Israeli IDF desert sand
- airbrush: highlight with Vallejo Sand Yellow
- Wash with GW Agrax Earthshade
- base w/ sand
- base detail black
- base detail muddy brown
- base detail sand brown
- base detail yellow bone highlight
- black boot base coat
- Reaper MSP Military Green Leggings base coat 1
- Reaper MSP Military Green Leggings base coat 2
- Reaper MSP Military Green shoulders base coat 1
- Reaper MSP Military Green shoulders base coat 2
- Reaper MSP Military Green breast plate base coat 1
- Reaper MSP Military Green breast plate base coat 2
- Reaper MSP Military Green back base coat 1
- Reaper MSP Military Green back base coat 2
- Reaper MSP Military Green helmet base coat 1
- Reaper MSP Military Green helmet base coat 2
- Reaper MSP Military Green webbing base coat 1
- Reaper MSP Military Green webbing base coat 2
- Reaper MSP Pure Black Weapons
- Reaper MSP Pure White chest aquila
- Reaper MSP Pure White helmet aquila
- GW Nuln Oil Wash on aquilas
- Reaper MSP Pure White highlights on aquilas
- Reaper MSP Pure White highlights on aquilas
- Reaper MSP Tanned Flesh Shadow face basecoat 1
- Reaper MSP Tanned Flesh Shadow face basecoat 2
- Reaper MSP Tanned Flesh Shadow hands basecoat 1
- Reaper MSP Tanned Flesh Shadow hands basecoat 2
- GW Silver lasgun bayonets basecoat 1
- GW Silver lasgun bayonets basecoat 2
- etc…
And here is the list of individual models! Craziness!
- 45 guardsmen w/ las rifles
- 7 Guardsmen w/ sniper rifles
- 4 guardsmen w/ melta
- 3 guardsmen w/ plasma
- 2 guardsman medics
- 2 guardsmen w/vox
- 1 guardsman w/ regimental standard
- 1 guardsman w/ platoon standard
- 1 guardsman grenade launcher
- 1 guardsman w/ flamer
- 1 guardsman w/ heavy flamer
- 1 sergeant w/ chain blade throwing a grenade
- 5 sergeants w/ las pistols and chain blades
- 1 officer with Rod and bolt pistol
- 1 officer with plasma pistol and chainblade
- 1 officer with power sword and power fist
- 1 officer with power sword and plasma
- 1 officer with las pistol and chain blade
- 1 astropath
- 1 commander of the fleet
- 1 master of ordinance
- 1 lord commissar
- 1 commissar with bolt pistol
- 1 marbo
- 9 auto cannons
- 9 heavy weapon gunners
- 9 heavy weapon spotters
- 1 scout sentinel
- 1 scout sentinel driver
- 4 vendetta pilots
- 4 vendetta door gunners
- 1 manticore driver
- 2 Vendetta stands
Share this:

Magnetizing the arms of the Warhound Titan
Below are the steps I took to magnetize the arms of my Warhound Titans.
I ended up using 3/8″ magnets, specifically 3/8″ by 1/4″ step sided magnets.
There is (barely) room for 1/2″ magnets (which I used on my Reaver) and if I could do it again I might use those…as the 3/8″ magnets are ‘slightly’ too weak.

This is where I chose to magnetize the arms.
Share this:

Forgeworld Warhounds WIP shots

A quick preview / work in progress pics of the pair of Forgeworld mars pattern warhound titans I’m currently building. I just finished the modular/LiPo/switched LED setup. Next is to finish detailing the cockpit and then epoxying the heads to the chassis.
.")
Share this:

League – Best Painted!
Wow, I won ‘best painted’ in the latest league at ATEase Games in Poway, CA with 1500 points of my blood angels army!!!
My army is on top of the dark grey foam on the right side of the picture in the middle.
There were some REALLY NICE armies on the table… Some great looking Necrons, Tyrranids, & Grey Knights in particular.

Share this:

Painting the ForgeWorld Reaver Titan Legs

- Start with a partially assembled and primed set of legs. I left off the leg piston guard assemblies, all pistons, leg armor, front & rear pelvis armor, leg cabling, toes, and knee plates)
- Using 3M 1/4″ Vinyl Tape, mask off the top and bottom of the upper leg main pistons.

(more…)

Share this:

Building the Forgeworld Reaver Titan Legs
- Test fit everything so you know what is what. Take your time here.
- Decide on your pinning strategy. Expand the below image to see where I decided to put pins.
 (more…)

Share this:

Forgeworld Reaver Titan Servitors

Overall I’m happy with the color scheme of the ‘interior’ of the titan. Instead of going with a very dirty, washed gunmetal or chainmail, I went for a ‘worn grey paint’ look. My inspiration was the inside of a Sea Knight helicopter sitting on the USS Midway aircraft carrier here in San Diego (see below for picture)

- Primed with Duplicolor grey sandable primer
- Airbrushed base coat of Reaper Master Series 9089 Cloudy Grey
- Airbrushed highlight of Reaper Master Series 9090 Misty Grey
- Skin tone is Reaper Fair Skin Tone triad, with a wash of Vallejo 73.204 flesh wash after the reaper ‘Fair Skin Shadow’ but before the two highlight layers were applied.
- I wanted the tubes to look ‘transparent’ with fluids (blood) going in/out of the servitor through the tube. I base coated white, slapped on a layer of Games Workshop gloss coat, then applied a very thin wash of clear blue and green (9096/9097) and matt medium and water. Overall I’m happy with the color, but not with the red lines… if I were to do it again I’d just go with the clear blue affect.
- The black is simply pure black, with edge highlighting from a woodless graphite pencil
- The metallic smudging/worn paint was applied by rubbing the woodless graphite pencil along the rivits, then smudging the graphite around randomly with my finger tip.
- Here’s the inspiration picture (click to enlarge):


Share this:

Building the Reaver Titan PowerFist
Goal: A fully magnetized and positionable reaver titan powerfist.
- Understand where each piece fits. While it’s obvious now, before I started assembling the arm I thought that the ‘wrist end’ of the arm was actually the ‘shoulder end.’ This ended up being okay, as I realized it before magnetizing the hand itself, but could have been disastrous had that not been the case. Take a second to carefully read the instructions, ID the parts, and figure our which parts go where. Test fit. In particular, separate the thumb finger set of pieces, the two ‘long’ sets of finger pieces, and the two ‘short’ sets of finger pieces. The thumb pieces only very slightly, with some wider knuckle covers, joins, etc.
- Optionally, magnetize the arm. I magnetized the mount to the shoulder, the first joint below the shoulder, and the wrist. I didn’t magnetize the elbow as there wasn’t an obvious way to do that joint, and it’s already a bit ‘fiddly’ with the three other magnetized joints (although with the 1/2 x 1/4 neodymium magnets is suprisingly secure).One thing to watch out for…I got the first joint ‘backwards’ such that the ‘more armor side’ of the should joint (fart right piece in below picture) was ‘outside.’ (‘up’ in the below picture). In fact, it should be INSIDE (down) if you want to be able to pose the arm ‘up and out’ (as in lift your right elbow away from your body) For the reaver to do that, the ‘short armor side’ of the upper/shoulder joint needs to be facing ‘up/out.’ As a result, my upper arm is ‘backwards,’ the ‘tube’ is facing forward from the inner elbow instead of facing back, and I was unable to use a piston. With all that said, I still think it looks great! If I could do it over again, I’d build it as designed. Ooops! If you build a power fist arm don’t make the same mistake as me!

(more…)

Share this:

Pinning the shoulders of a Reaver Titan

Here are the steps I took to pin the shoulders of a reaver titan…
- I used JB-Weld epoxy to first glue to shoulders to the main body of the reaver titan. Because the shoulders will be subject to leveraged weight of the weapon arms, I wanted this to be as strong of a bond as possible, so I roughed up the surface of the weld on both the body and the shoulder pieces with the hobby knife, and used the ‘full strength’ JB-Weld (instead of the JQ-Quick). When using full strength, you have to let it cure overnight… and to ensure that nothing shifted during curing I clamped the heck out of each shoulder.

(more…)

Share this:

Magnetizing the weapon arms on a ForgeWorld Reaver Titan
After dropping the ridiculous amount of money for expertly cast resin parts from the UK… aka a VERY expensive pile of plastic… and spending weeks upon weeks of building and painting it, I don’t want to take it to my first game and regret my choice of hard mounted weapons!
Sooo… I bought all the available Imperial weapons, and decided to magnetize the shoulders of the reaver and each of the weapon arms. The challenge is that the Power Fist has a ‘flat’ interface to the shoulder socket where the other three arms have a ‘ball’ interface to the shoulder socket, so I had to essentially make the weapon/shoulder interface the same for all weapons.
To do this, I made the ‘ball’ weapon interface ‘flat’ and used the cut tops of the arms to hold the magnet in exactly the right place in the shoulder. Hopefully this diagram explains (the square rectangles within the named parts are where the magnets sit).

Share this:

Chroming the Reaver Titan pistons

- The very first step was to smooth the pistons surface as much as possible. The Alclad 2 highly metallic paints are SO shiny that every imperfection in the surface shows clearly. So… I used a Dremel and a fine grit abrasive buff.
- As a test, to ensure I have good paint adhesion and am okay with the texture of the Duplicolor sandable primer, I primed the 16 toe pistons of the reaver titan. Because I want ‘resin->resin’ bonds when I glue the pistons in, the first step was to use adhesive putty (aka poster putty or blu tack) to cover the portions of the pistons that will glue in.

(more…)

Share this:

Cleaning the ForgeWorld Reaver Titan
Before construction can begin in earnest, each of thousands of individual components (311) must be meticulously cleaned… a laborious effort directed by tech priests and carried out by menials and servitors… who literally go over each part with a toothbrush.
- The first step is to pop off the gates, cutting away from the model to avoid damage. This allows good access by the brush while scrubbing. I’m keeping all the extra resin, as I’ll use it to test primer adhesion and paint colors, test drill holes for magnets, and eventually use it as rubble in terrain. 90% of the gates can/should be cut with sprue cutters, and few large gates (like on the main body) require a razor saw.
- I then let the parts soak in hot soapy water for 5 minutes (not scalding, as I don’t want to deform the resin).
- After a bit of a soak, for the larger parts I loaded up a relatively stiff brush with dish soap and water and scrub away. The goal is to get the mold release off the resin, and having dealt with paint adhesion on resin issues before, I don’t half ass this part. For the smaller pieces I use a toothbrush, and am VERY careful to not loose track of any small pieces. I typically take an inventory after the scrub down to make sure nothing is missing.

(more…)

Share this:

Blood Angels Death Company


After much deliberation, browsing pictures of ‘black’ miniatures on dakka dakka the only truly black example that I found and liked was at cool mini or not, and I don’t have the skill nor the patience to pull that off… so I decided to give my good old airbrush (read easy blends!) a try.
I primed with Vallejo black surface primer, followed by a coat of Reaper Adamantium Black, followed by a highlight of blackened steel. You can see the ‘raw’ airbrush output, which makes the models look very, very grey compared to a pure black model.
I then applied two layers of Games Workshop badab black wash, which darkened the grey look significantly. The models ended up looking a bit ‘drab’ and I’m hoping that a satin varnish applied as the last protective coat will add enough shine/contrast/depth to give the effect of highlighted black armor instead of oily grey armor. We’ll see how it turns out!


